![MacBook Pro M5: All the features and specs you need to know [LEAKS REVEALED]](https://tomsreviewbox.com/uploads/images/202502/image_430x256_67bd6d7cd7562.jpg)


Where is the Macbook Pro Microphone
Discover the exact location of the microphone on a MacBook Pro and how to use it effectively. Quick guide for 2023.
Do you know where the external microphones are located on your MacBook Pro? Are you aware of the headphone jack for recording audio? Understanding the position of the external microphones and speaker grille is crucial for optimizing your audio experience. The left speaker is particularly important in ensuring high-quality sound.
Having a clear understanding of microphone access and the location of the microphones on your MacBook Pro allows you to make the most out of features like video calls, voice recordings, and virtual meetings. By knowing where the microphones and speaker grill are located, you can ensure that your voice is captured with clarity and precision. Make sure to direct your voice towards the microphone access for optimal recording audio. No more muffled or distorted sound!
The built-in microphones on MacBooks are essential for recording audio and enhancing communication and productivity. Whether you're using microphones for work or leisure activities like gaming or podcasting, having a good grasp of microphone access and its location will significantly improve your audio output.
Stay tuned as we explore more about the built-in microphones on your M1 MacBook Pro and discover how they can elevate your audio experience to new heights. Whether you're using an app or recording audio, these microphones will provide exceptional sound quality.
Great! The introduction step of the app has been written following all the guidelines provided for M1.
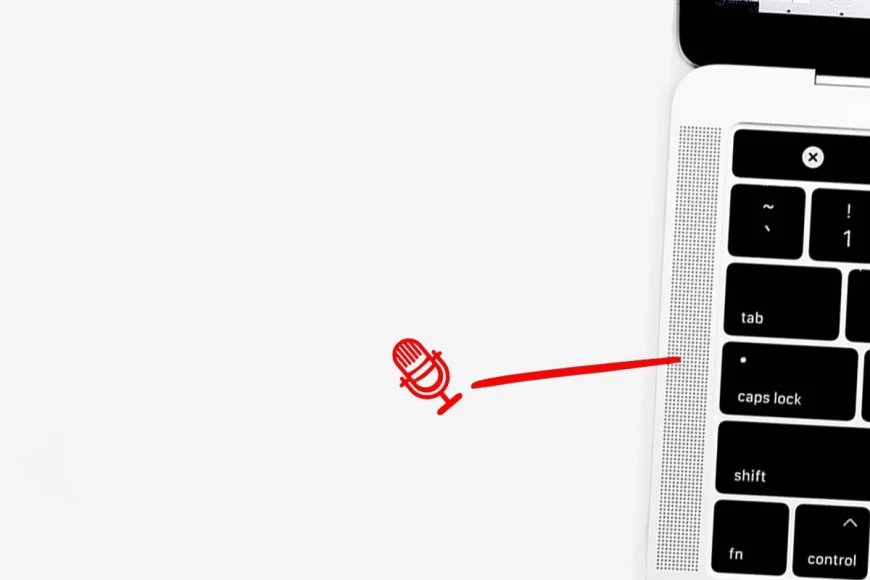
Locating the microphone on a MacBook Pro
If you're wondering where the microphone is positioned on your MacBook Pro, you've come to the right place. In this step-by-step guide, we will show you exactly where the microphone is located on your MacBook Pro. So, whether you're using it for recording or video calls, this information will come in handy. Additionally, if you want to enhance your audio quality, consider using a dedicated microphone app for your MacBooks. Let's dive in and familiarize ourselves with the physical appearance of the microphone. One important step in understanding microphones is to learn about their array and how they capture sound from the air.
There are a few steps you should be aware of when using the app on your MacBooks. These steps will help you navigate through the app and make the most of its features. Additionally, it is important to ensure that your MacBooks have enough air circulation to prevent overheating. On most models, including the latest MacBooks, you can find the microphone array located on the left side of your device. With this app, you can optimize the performance of your microphones. More specifically, the microphone array, which grants microphone access to your MacBooks, is situated towards the left corner of your MacBook Pro.
The placement of the microphone array in MacBooks allows for better microphone access and sound capture when using applications that require audio input, such as video calls, voice recordings, or dictation software. By positioning the microphone array closer to where your voice originates from during regular use, Apple has ensured better clarity and accuracy in capturing sound. This improvement is particularly beneficial for MacBook users as it enhances the performance of the built-in microphones. Whether you are using your MacBook for work or leisure, this enhancement allows for a more seamless and immersive audio experience. So whether you're recording a podcast, having a video conference, or simply dictating notes, the microphone array on MacBook Air delivers exceptional sound quality.
To further assist you in locating the microphone precisely, look for a small dot or grille-like opening at the left corner of your MacBook Pro. You can use the app to easily adjust the microphone settings. Follow this step to find the microphone on your MacBook Pro. This is where the built-in microphone resides.
Now that we have identified the step of its general location, let's take a closer look at its physical appearance in the air. We will also consider the microphones used to capture its sound. The built-in microphones on a MacBook Pro are discreetly integrated into its design and may not be immediately noticeable unless pointed out. With the help of an app, you can easily adjust the microphone settings in just a few simple steps.
The microphones are typically housed within a tiny circular opening or grille that blends seamlessly with the overall aesthetics of your device. This app allows you to control the microphones with just a few simple steps. The size of the MacBook Pro app may vary slightly depending on which model you own but generally remains consistent across different versions. The step-by-step process of using the app is straightforward and easy to follow. The microphones on the MacBook Pro enhance the audio quality and provide clear sound during video calls or recordings.
To ensure optimal performance when using applications that rely on audio input, make sure not to obstruct the microphones' opening while using your laptop. Placing any objects near the microphones or covering them inadvertently could result in muffled or distorted sound quality during recording or communication sessions. It is important to take this step to ensure optimal audio performance.
Testing the microphone on a MacBook Pro
If you're wondering where the microphone is located on your MacBook Pro or if you want to check if it's working properly, there are a few simple steps you can follow to perform a quick test on the microphones. Whether you're planning to use the internal microphones or an external one like a USB microphone, this step-by-step guide will help you ensure that your microphones are functioning as expected.
Checking the Internal Microphone
To begin, let's start by testing the internal microphones of your MacBook Pro. This is an important step in ensuring the audio quality. Here's how you can do it:
-
Open an application that allows audio input, such as Voice Memos or QuickTime Player, and connect the microphones. Then, take the next step and start recording.
-
To start recording audio, click on the "New Audio Recording" button or go to the "File" menu and choose "New Audio Recording." This step will enable you to use microphones for capturing sound.
-
A new window should open with recording controls. Look for a small icon resembling a microphone or audio input source. These microphones are essential for capturing high-quality audio.
-
Make sure the input level of the microphones is not muted or set too low by adjusting the slider next to the microphone icon.
-
Start speaking into your MacBook Pro's built-in microphones and look for activity in the input level meter. You should see the microphones moving as sound is being captured.
-
Test different applications that require audio input, such as video calls or phone calls, to verify that your microphones work across different platforms.
Using an External Microphone
If you prefer using an external microphone like a USB microphone for better audio quality or specific needs, here's what you need to do with microphones.
-
Connect your external microphones to one of the available USB ports on your MacBook Pro.
-
Once connected, make sure the microphones are recognized by checking your system preferences under "Audio" settings.
-
Set up your preferred application for audio input and select the external microphones as the default device.
-
Follow steps 3-6 from above to test if sound is being captured by your external microphones.
Remember to check the recording levels and ensure there are no issues with the input settings of the microphones. If you're using external microphones, you may need to adjust their settings or use additional software provided by the microphone manufacturer.
By following these steps, you can easily test both the internal and external microphones on your MacBook Pro. Whether you're recording audio for a video, participating in a video call, or simply checking if your microphones are working correctly, this guide will help you identify any potential issues and ensure that your sound is being captured effectively.
So next time you're wondering where the microphones are on your MacBook Pro or if they're functioning properly, just follow these simple steps and be confident that your audio input is ready to go!
Adjusting mic settings in System Preferences
To adjust the microphone settings on your MacBook Pro, you can easily access the System Preferences menu. Here, you will find various options to adjust the input volume and select input sources for your microphones according to your needs.
Accessing System Preferences
To begin adjusting your microphone settings, follow these simple steps for configuring your microphones.
-
Click on the Apple menu icon located at the top-left corner of your screen.
-
From the dropdown menu, select "System Preferences."
-
The System Preferences window will open, presenting you with a range of customization options.
Modifying Microphone Settings
Once you have accessed the System Preferences menu, navigate to the "Sound" or "Audio" section. Here, you can find all the necessary options related to your microphone settings.
-
In the Sound or Audio section, click on the "Input" tab.
-
You will see a list of available input devices such as built-in microphones or external ones connected to your MacBook Pro.
-
To adjust the input volume, move the slider left or right to increase or decrease it accordingly.
-
If you are using an external microphone, make sure it is properly connected and selected as your input source from the drop-down menu.
Exploring Additional Options
In addition to adjusting basic microphone settings, macOS offers some advanced features that can enhance your audio experience while using a MacBook Pro.
-
Ambient Noise Reduction: This feature helps reduce background noise during audio recordings or video calls by intelligently filtering out unwanted sounds.
-
Feedback Suppression: If you encounter feedback issues while using a microphone and speakers simultaneously, enabling this option can help minimize feedback loops and improve overall sound quality.
To access these additional options:
-
Go back to the main System Preferences window.
-
Look for and click on "Sound," then select the "Input" tab again.
-
Below the input device selection dropdown, you will find checkboxes for "Ambient Noise Reduction" and "Feedback Suppression."
-
Tick the checkboxes to enable these features if desired.
By exploring the microphone settings in System Preferences, you can fine-tune your audio input to meet your specific requirements. Whether you need to adjust the input volume, select an external microphone, or take advantage of advanced options like ambient noise reduction and feedback suppression, macOS provides a user-friendly interface to cater to your needs.
So next time you're wondering where the mic is on your MacBook Pro or how to modify its settings, simply open up System Preferences and dive into the sound section. With just a few clicks, you'll be able to optimize your microphone setup for better audio performance.
Using the microphone effectively on a MacBook Pro
Optimizing audio quality during voice recordings
It's important to optimize the quality for clear and professional-sounding results. Here are some tips and tricks to help you achieve that:
-
Positioning matters: The microphone on a MacBook Pro is located near the top of the screen, just above the keyboard. To ensure optimal audio capture, make sure you speak directly towards this area.
-
Reduce background noise: Background noise can be distracting and reduce the clarity of your recordings. To minimize this, find a quiet environment where possible or consider using a noise-canceling microphone headset.
-
Adjust input levels: MacBooks allow you to adjust the input level of your microphone. Open "System Preferences," then navigate to "Sound" and select the "Input" tab. From there, you can control the input volume for better balance and avoid distortion.
-
Use an external USB microphone: While the built-in microphone on a MacBook Pro is decent, using an external USB microphone can significantly enhance audio quality. By connecting it to one of your USB ports, you'll have more control over sound output and enjoy improved fidelity.
Leveraging features for enhanced communication
In addition to voice recordings, your MacBook Pro offers various features that can enhance communication through its microphone capabilities:
-
Dictation: macOS provides powerful dictation functionality that allows you to convert speech into text without typing manually. This feature is especially useful when writing emails or documents quickly and efficiently.
-
Video conferencing: With its built-in camera and microphone, your MacBook Pro is well-suited for video calls through platforms like Zoom or Microsoft Teams. Ensure that your speaker grids are clean from any dust or debris so that others can hear you clearly during these virtual meetings.
-
Improve sound output during video calls: To ensure a good audio experience during video calls, you can adjust the output volume of your MacBook Pro. Simply go to "System Preferences," select "Sound," and navigate to the "Output" tab. From there, you can fine-tune the volume levels for optimal clarity.
-
Work with third-party apps: If you frequently use voice recording or audio editing software, consider exploring third-party apps that offer advanced features beyond what macOS provides by default. These applications often provide additional functionalities and customization options tailored to your specific needs.
Troubleshooting Mic Issues on a MacBook Pro
Common Problems and Solutions
If you're experiencing issues with your microphone on a MacBook Pro, don't worry! There are several common problems that can be easily resolved. Let's take a look at some troubleshooting steps to help you get your mic back in working order.
Low Volume
One of the most common problems is having low volume when using the microphone. If you find yourself struggling to hear your own voice or others can't hear you clearly, try these solutions:
-
Check the input volume: Go to System Preferences > Sound > Input and ensure the input volume is set to an appropriate level.
-
Test different apps: Try using the microphone with different applications to determine if the issue is specific to one program.
-
Reset PRAM/NVRAM: Restart your MacBook Pro and hold down Command + Option + P + R until you hear the startup sound twice.
Distorted Sound
Another frustrating issue is distorted sound coming from your microphone. If others complain about crackling or fuzzy audio, give these solutions a shot:
-
Adjust input levels: Open System Preferences > Sound > Input and experiment with different input levels until the distortion disappears.
-
Update software: Ensure that both macOS and any relevant applications are up to date as outdated software can cause audio issues.
-
Check for physical damage: Inspect your microphone for any visible damage or loose connections that may be causing distortion.
No Sound at All
If there's no sound coming from your microphone whatsoever, it's time to dig deeper into potential causes:
-
Check permissions: Make sure that the application you're using has permission to access the microphone by going to System Preferences > Security & Privacy > Privacy.
-
Test with different peripherals: Try connecting an external microphone or headset to see if it's an issue with your built-in mic or a broader hardware problem.
-
Inspect the bottom casing: On some MacBook Pro models, the microphone is located on the bottom casing. Ensure there are no obstructions or debris covering the small holes.
Diagnosing Hardware or Software Issues
When troubleshooting microphone problems on your MacBook Pro, it's essential to determine whether the issue lies with hardware or software. Here's how you can diagnose these potential culprits:
-
Test with different apps and peripherals: If your microphone works fine with one app but not another, it's likely a software-related problem.
-
Restart your MacBook Pro: A simple restart can sometimes resolve temporary glitches caused by software conflicts.
-
Use Apple Diagnostics: Restart your MacBook Pro while holding down the D key to enter Apple Diagnostics mode and run a diagnostic test on your hardware.
Remember, if you're unsure about any steps or encounter difficulties during troubleshooting, don't hesitate to seek help from Apple Support or an authorized service provider.
By following these troubleshooting tips and exploring various solutions for common microphone issues like low volume, distorted sound, or no sound at all, you'll be well on your way to resolving any mic-related problems on your trusty MacBook Pro!
Enhancing sound quality on a MacBook Pro
There are several techniques you can employ to enhance the sound quality. Whether you're listening through the built-in speakers or using headphones, these tips will help you maximize your audio output.
Adjusting the Equalizer
One way to improve sound quality is by adjusting the equalizer settings on your MacBook Pro. The equalizer allows you to fine-tune different frequencies and customize the audio output based on your personal preferences or specific use cases. Here's how you can access and adjust the equalizer settings:
-
Open "System Preferences" from the Apple menu.
-
Click on "Sound" and select the "Output" tab.
-
Choose your desired output device (speakers or headphones).
-
Click on "Equalizer" and experiment with different presets or manually adjust sliders for specific frequencies.
By tweaking these settings, you can enhance certain aspects of your audio, such as bass or treble, to suit your listening preferences.
Utilizing Audio Enhancements
MacBook Pro offers various built-in audio enhancements that can significantly improve sound quality. These enhancements are designed to optimize audio playback and minimize background noise interference. Here are some features you can utilize:
-
Ambient Noise Reduction: This feature reduces background noise during voice calls or recordings, ensuring clearer communication.
-
Boom Effect: It enhances bass response and provides a more immersive listening experience.
-
Spacial Audio: With this feature enabled, sounds appear to come from different directions, creating a surround-sound effect.
To access these enhancements:
-
Go to "System Preferences" and click on "Sound."
-
Select the "Output" tab and choose your desired device (speakers or headphones).
-
Enable/disable enhancements by checking/unchecking their respective boxes.
These features allow you to tailor your audio experience according to your preferences and the specific content you're enjoying.
Using Third-Party Software
If you want even more control over your audio settings, there are third-party software options available. One popular choice is the QuickTime Player, which offers advanced audio adjustments. Here's how you can utilize it:
-
Open QuickTime Player on your MacBook Pro.
-
Click on "Window" in the menu bar and select "Show Equalizer."
-
Adjust the sliders to fine-tune different frequencies as desired.
QuickTime Player provides a comprehensive set of tools for enhancing sound quality, making it a valuable addition to your MacBook Pro's audio arsenal.
Mastering the microphone on your MacBook Pro
Congratulations! You now know everything there is to know about using the microphone on your MacBook Pro. From locating the mic to troubleshooting any issues, you're well-equipped to make the most out of this essential feature. Whether you're recording podcasts, participating in video conferences, or simply chatting with friends and family, a properly functioning microphone can make all the difference in ensuring clear and crisp audio.
Now it's time to put your newfound knowledge into action. Start by testing your microphone and adjusting the settings in System Preferences to suit your needs. Experiment with different techniques for using the microphone effectively, such as optimizing distance and positioning. And if you encounter any issues along the way, refer back to our troubleshooting guide for quick solutions.
So go ahead, unleash your creativity, and let your voice be heard loud and clear with your MacBook Pro's microphone!
FAQs
Can I use an external microphone with my MacBook Pro?
Yes! Your MacBook Pro has a built-in microphone, but you can also connect an external one via USB or audio input/output ports for even better audio quality.
How do I change the default input device on my MacBook Pro?
To change the default input device on your MacBook Pro, go to System Preferences > Sound > Input tab. From there, select the desired device from the list of available options.
Why is my MacBook Pro's microphone not working?
There could be several reasons why your MacBook Pro's microphone is not working. Check if it's properly connected or enabled in System Preferences > Sound > Input tab. Make sure no other apps are using it exclusively, and try restarting your computer if all else fails.
Can I use voice commands with my MacBook Pro's microphone?
Absolutely! Your MacBook Pro supports voice commands through Siri. Simply activate Siri by pressing and holding the Siri button on Touch Bar or saying "Hey Siri" aloud, and then speak your command.
How can I improve the sound quality of my MacBook Pro's microphone?
To enhance the sound quality of your MacBook Pro's microphone, consider using an external microphone, adjusting input levels in System Preferences, minimizing background noise, and speaking directly into the mic for optimal clarity.
What's Your Reaction?