![MacBook Pro M5: All the features and specs you need to know [LEAKS REVEALED]](https://tomsreviewbox.com/uploads/images/202502/image_430x256_67bd6d7cd7562.jpg)


Where is the MacBook Air Microphone Located
Discover the precise location of the microphone on MacBook Air and learn how to use it effectively. Uncover the best methods in this comprehensive guide.
Have you ever wondered where the exact location of the microphones on your MacBook Air is? Are you interested in recording audio using your MacBooks? It's a small but important detail that often goes unnoticed in the context of work. Having a good case for your keyboard is essential. But fear not, we're here to help shed some light on this mystery for people who need assistance with text or speakers.
The built-in microphones on MacBooks, or mics, are discreetly integrated near the top of the screen, cleverly blending into its thin bezel. They are perfect for recording audio. To locate microphone access, simply look for a small pinhole near the camera. This pinhole is where you can find the microphones. Additionally, some devices may have a recording indicator light next to the microphone array. Yes, it's that inconspicuous!
Knowing the precise location of the microphones on your MacBook Air, especially with the new M1 chip, can be useful in various situations. Whether you need to optimize audio quality or position yourself on the right side for better recording, understanding the microphone placement is essential. Whether you need to record audio, participate in online meetings or conferences, or even use voice commands with Siri, having microphone access on your MacBooks or MacBook Pros ensures optimal performance and convenience.
Now that we've revealed the secret behind its placement, let's step aside and shed some light on how this unassuming side feature plays a significant role in enhancing your overall user experience. From step one, it grants easy microphone access, making it even more convenient for you.
Great! The first step in using the microphone on your device is to ensure that you have granted microphone access to the app or website you are using. This is important because without proper microphone access, you will not be able to use the microphones on your device. So before you proceed, make sure you have given the necessary permissions to access the microphone. This will allow you to record audio, make voice calls, and use any other features that require microphone input. So, let's get started and take this first step towards using your device's microphones effectively.
How to find the microphone on MacBook Air
To use the microphones on your MacBook Pro, you first need to locate them. The microphones in MacBooks are essential components that allow you to record audio, make voice calls, and interact with voice recognition software. They are a key step in using your MacBook Pro effectively. In this guide, we will show you how to find the microphone on your MacBook Air. Whether you are using a MacBook Pro or any other model of MacBooks, this step-by-step tutorial will help you locate the microphone easily.
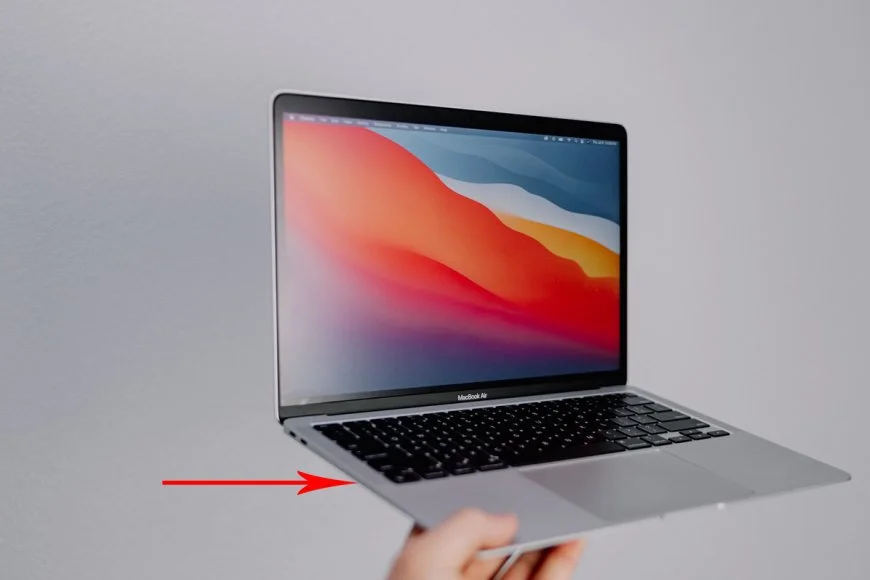
Look for a tiny hole next to or above your MacBook Air's display
The microphone on a MacBook Air is typically located near the top of the screen, either next to or above it. MacBooks Pro also have microphones in the same location. It appears as a small hole that blends in with the design of your MacBook Pro. MacBooks have microphone access, allowing you to use the built-in microphones for various purposes. This step ensures that the microphones on your MacBook Pro can effectively capture audio from in front of your device, making it perfect for recording on MacBooks.
The location may vary slightly depending on your specific model and year of release
While most MacBook Air models, including the MacBook Pro, have their microphones positioned near the top of the display, there might be slight variations depending on when and which model you own. Apple has made minor changes to the design of the MacBook Pro over time, so it's important to familiarize yourself with the specifics of your particular device. This includes understanding the steps involved in using the microphones.
Here are some examples of where you might find the microphones on your MacBook Pro. Follow these steps.
-
On older MacBook Air models (2010-2017), you can typically find the microphone hole above the screen bezel. These microphones are an essential step in capturing audio on these devices.
-
MacBook Air (2018-present): In more recent models, such as those released after 2018, Apple moved the microphone step hole to a position next to the FaceTime camera.
Remember to refer to Apple's official documentation or support resources for precise information about the microphones on your specific MacBook Air model. These guidelines are general and meant to help you take the necessary steps when dealing with microphones.
The microphone is designed to capture audio from in front of your laptop
The primary purpose of having built-in microphones on a MacBook Air is to capture sound coming from in front of your computer. This step is crucial for ensuring high-quality audio recordings. This design ensures optimal performance during activities like making video calls or recording audio notes on a MacBook Pro using microphones.
When using applications that rely on microphones, such as video conferencing software or voice recording apps, it's important to position yourself in front of the MacBook Air. This way, the microphones on your MacBook Pro can effectively pick up your voice or any other audio you want to capture.
Step-by-step guide for using the microphone on a Mac
To fully utilize the microphones on your MacBook Air, follow these simple steps.
-
Open an application that requires audio input:
-
Voice Memos
-
QuickTime Player
-
-
Choose "Internal Microphone" as your input source:
-
In Voice Memos: Click on the microphone icon on your MacBook Pro to open the recording window.
-
In QuickTime Player: Go to "File" and select "New Audio Recording" using microphones on a MacBook Pro.
-
-
Configure the application's settings or preferences:
-
In Voice Memos on your MacBook Pro, make sure to select "Internal Microphone" as the input source for recording.
-
In QuickTime Player: Click on the dropdown menu next to the record button and choose "Internal Microphone" for your MacBook Pro.
-
-
Position yourself near the built-in microphones of your MacBook Air.
-
The built-in microphones are located around the top left area of your keyboard, near the display hinge.
-
-
Start recording audio or engage in video calls:
-
For audio recordings using microphones: Press the record button in either Voice Memos or QuickTime Player.
-
During video calls, ensure that you have chosen the appropriate microphone option in your preferred communication app (e.g., Zoom, Skype) to optimize the audio quality.
-
-
Speak clearly into the vicinity of your MacBook Air's built-in microphones to ensure optimal sound quality.
-
To ensure optimal sound quality, position yourself within a reasonable distance from your laptop while speaking and make sure to use high-quality microphones.
-
-
Monitor audio levels and adjust accordingly:
-
Keep an eye on the volume meter within your chosen application to prevent distortion or low recording levels when using microphones.
-
-
Save or share your recordings using different formats for sharing purposes. Once you are satisfied with your recording, save it by clicking on "Save" or export it to different formats for sharing purposes using microphones.
By following these simple steps, you can fully utilize the internal microphones of your MacBook Air. This will enhance your experience with voice memos, podcasting, video conferencing, and other audio-related tasks.
Keep in mind that if you prefer to use an external microphone, your MacBook Air offers options for connecting external microphones via the headphone jack or USB ports. This allows you to take advantage of different microphone arrays or specialized microphones for specific recording needs.
So whether you're a content creator, musician, or someone who simply wants to record audio on their MacBook Air, following these steps will ensure that you can easily access and utilize the built-in microphone in no time.
Adjusting microphone settings in System Preferences
To ensure optimal performance and clear audio during your recordings or video calls, it's important to adjust the microphone settings on your MacBook Air. By navigating through the System Preferences menu, you can easily make changes to suit your specific needs.
Accessing System Preferences and Sound Settings
-
Start by clicking on the Apple menu located at the top-left corner of your screen.
-
From the drop-down menu, select "System Preferences." This will open a new window with various customization options for your MacBook Air.
-
Within the System Preferences window, locate and click on the "Sound" icon. This will take you to a dedicated panel for adjusting audio settings.
Exploring the Input tab
Once you've accessed the Sound settings, navigate to the "Input" tab. Here, you'll find several options that allow you to fine-tune your microphone preferences.
-
The first setting you may want to adjust is the input volume level. Use the slider provided to increase or decrease the sensitivity of your microphone according to your preference.
-
If background noise is an issue, enable ambient noise reduction by ticking the corresponding checkbox. This feature helps minimize unwanted sounds during recordings or calls.
-
Some applications like QuickTime Player or Siri have their own independent settings for selecting audio input sources. However, if you wish to set a default input device for all applications, make sure to choose it from the "Use audio port for" dropdown menu.
Additional Settings and Privacy Considerations
While adjusting microphone settings in System Preferences ensures optimal performance in most cases, there are a couple of additional aspects worth mentioning:
-
Recording Indicator Light: When an application is actively using your MacBook Air's microphone, a small recording indicator light might appear next to its name within this Sound panel.
-
Privacy Tab: In some instances, certain applications may require access permissions before utilizing your microphone. If you encounter any issues, navigate to the "Privacy" tab within System Preferences and grant the necessary permissions.
By following these steps and exploring the various options available in the Sound settings menu, you can easily customize your MacBook Air's microphone settings to suit your recording or communication needs. Remember to experiment with different configurations until you find the perfect balance between audio clarity and background noise reduction.
Now that you know how to access and adjust microphone settings through System Preferences, you can confidently enhance your audio experience on your MacBook Air.
Enabling and Disabling Microphone Access for Apps
To ensure the privacy of your MacBook Air, it's important to have control over which apps can access your microphone. By granting or revoking app permissions, you can decide which software has the ability to use your microphone. Here's how you can manage microphone access on your MacBook Air:
-
Navigate to "System Preferences" and select "Security & Privacy."
-
Open the Apple menu by clicking on the Apple logo in the top-left corner of the screen.
-
Choose "System Preferences" from the drop-down menu.
-
In the System Preferences window, click on "Security & Privacy."
-
-
Click on the "Privacy" tab and choose "Microphone" from the left-hand sidebar.
-
Once you're in the Security & Privacy settings, click on the "Privacy" tab at the top.
-
On the left-hand sidebar, find and select "Microphone."
-
-
Check or uncheck boxes next to app names to grant or revoke their access to use your MacBook Air's microphone.
-
To allow an app access to your MacBook Air's microphone, check its corresponding box in the list.
-
To disable an app's access to your microphone, simply uncheck its box.
-
Managing app permissions for microphone access is crucial for maintaining privacy and security. By following these steps, you can easily control which apps have permission to utilize your MacBook Air's microphone.
It's important to regularly review these settings as new applications may request microphone access or existing ones may need their permissions adjusted. Be mindful of granting permission only to trusted applications that genuinely require this functionality.
By taking control of app permissions, you not only protect your privacy but also ensure that no unauthorized application gains access to sensitive audio recordings without your knowledge.
Remember that while some apps might legitimately require microphone access for essential functions like voice recording or video calls, others may exploit this permission for malicious purposes. Therefore, it's essential to be cautious and grant microphone access only to reputable applications from trusted sources.
Troubleshooting input volume and other microphone issues
If you're wondering where the microphone is located on your MacBook Air or experiencing any microphone-related problems, this section will guide you through troubleshooting steps to resolve common issues.
Low Input Volume
One common problem users face is low input volume when using the internal microphone on their MacBook Air. If you find that your voice isn't being picked up properly or sounds faint, there are a few things you can check:
-
External Factors: Ensure that no external factors are obstructing or muffling sound around your laptop. Sometimes, placing your MacBook Air too close to a wall or having objects in front of the speakers can affect audio input. Try moving to a different location and see if it improves the volume.
-
Conflicting Applications: Check if any third-party software or conflicting applications might be affecting your MacBook Air's microphone performance. Certain apps may have control over audio settings and could interfere with the input level. Quitting these apps or adjusting their settings might help resolve the issue.
-
Restart and Reset: If the low input volume problem persists, try restarting your MacBook Air. This simple step can sometimes clear out temporary glitches affecting the microphone. Resetting the System Management Controller (SMC) can also troubleshoot persistent microphone issues. To reset SMC on different MacBook Air models, refer to Apple's official support documentation.
Using External Microphones
Sometimes, using an external microphone can provide better audio quality for specific purposes such as recording podcasts, streaming, or video conferencing. Here's what you need to know about connecting external microphones to your MacBook Air:
-
USB Microphone: The easiest way to connect an external mic is by using a USB microphone. These microphones come with plug-and-play functionality and require no additional setup. Simply connect it to an available USB port on your MacBook Air, select it as the audio input device in system preferences, and you're good to go.
-
Headphone Jack: If you have a microphone with a 3.5mm audio jack, you can use an adapter or splitter to connect it to the headphone jack on your MacBook Air. However, some microphones may require additional power or have compatibility issues. Make sure to check the specifications of your microphone and consult the manufacturer's instructions for proper setup.
Remember that when using external microphones, you might need to adjust the input level in system preferences to optimize audio quality. Experiment with different levels until you find the right balance between volume and clarity.
Dealing with Noise and Distortion
Another common issue users face is unwanted background noise or distortion when using the internal microphone on their MacBook Air. Here are a few tips to minimize these problems:
-
Speaker Grills: The internal microphone is located beneath the left speaker grille on most MacBook Air models. Ensure that there is no debris or dust blocking the grille as this can affect sound quality. Gently clean any obstructions using a soft brush or compressed air.
-
Minimizing External Noise: If you're recording in a noisy environment, consider using headphones with a built-in microphone or invest in an external mic that offers noise-canceling features. These options can help reduce background noise and provide clearer audio recordings.
-
Adjusting Input Level
Testing the quality of the MacBook Air's microphone
To ensure optimal sound quality during recordings or video calls on your MacBook Air, it is essential to test the performance of its built-in microphone. By following a few simple steps, you can assess the audio recording capabilities of your device and make necessary adjustments for an enhanced user experience.
-
Open "System Preferences" and select "Sound," then go to the "Input" tab.
-
On your MacBook Air, navigate to the Apple menu located at the top-left corner of your screen.
-
Choose "System Preferences" from the drop-down menu.
-
In the System Preferences window, click on "Sound."
-
Once in the Sound settings, navigate to the "Input" tab.
-
-
Speak into your MacBook Air's built-in microphone while observing the input level meters.
-
Position yourself comfortably in front of your computer.
-
Start speaking at a normal volume into your MacBook Air's microphone.
-
Observe the input level meters displayed in real-time on your screen.
-
These meters indicate how loud or soft your voice is being picked up by the microphone.
-
-
-
Adjust input volume settings as needed to optimize audio quality during recordings or video calls.
-
If you notice that your voice is too low or barely registering on the input level meters:
-
Increase the input volume by moving the slider towards higher values in System Preferences > Sound > Input tab.
-
Ensure that there are no obstructions blocking your MacBook Air's speaker grill or microphone array.
-
-
If you observe that there is distortion or clipping in sound due to excessively high levels:
-
Decrease the input volume by moving the slider towards lower values in System Preferences > Sound > Input tab.
-
-
It is worth noting that newer MacBooks, including MacBook Pro models, often feature improved microphones compared to older versions. These advancements include ambient noise reduction technology and enhanced sound quality. However, MacBook Airs also provide satisfactory audio recording capabilities for most users.
By testing the microphone on your MacBook Air and adjusting input volume settings accordingly, you can optimize its performance for various applications such as video calls, audio recordings, or any other scenario where sound quality matters. Whether you are using your MacBook Air for personal or professional purposes, ensuring clear and crisp audio will significantly enhance your overall experience.
Understanding and optimizing the use of the microphone on MacBook Air
Now that you know how to find the microphone on your MacBook Air and have learned step-by-step instructions for using it, adjusting settings, enabling or disabling access for apps, troubleshooting issues, and testing its quality, you're well-equipped to make the most out of this feature. Whether you need it for video calls, recording audio, or any other task that requires sound input, your MacBook Air's microphone is ready to serve you.
To ensure optimal performance, remember to keep your microphone clean and free from obstructions. Don't forget to regularly update your macOS and apps to benefit from any improvements or bug fixes related to audio functionality. So go ahead and start using your MacBook Air's microphone with confidence!
FAQs
Can I connect an external microphone to my MacBook Air?
Yes! You can connect an external microphone to your MacBook Air using either the headphone jack (3.5mm) or a USB port. Simply plug in the compatible microphone and select it as the input device in System Preferences > Sound > Input.
How do I improve the sound quality of my recordings?
To enhance sound quality when recording with your MacBook Air's built-in microphone or an external one, consider these tips:
-
Position yourself close to the mic.
-
Minimize background noise.
-
Use a pop filter if needed.
-
Experiment with different recording environments.
-
Adjust input volume levels in System Preferences > Sound > Input.
Why is my microphone not working properly on certain apps?
If you're experiencing issues with specific apps not recognizing or properly utilizing your microphone on your MacBook Air:
-
Check app permissions in System Preferences > Security & Privacy > Privacy tab.
-
Make sure you've granted permission for those apps to access the microphone.
-
Quit and relaunch the problematic app after granting permissions.
Can I use Siri with my MacBook Air's microphone?
Absolutely! You can use Siri with your MacBook Air's built-in microphone. Simply activate Siri by clicking on the Siri icon in the menu bar or using the keyboard shortcut (if enabled) and speak your commands or questions.
Is it possible to disable the microphone temporarily?
Yes, you can disable the microphone on your MacBook Air temporarily by adjusting the input volume level to zero in System Preferences > Sound > Input. This will prevent any audio input from being picked up until you re-enable it.
What's Your Reaction?