![MacBook Pro M5: All the features and specs you need to know [LEAKS REVEALED]](https://tomsreviewbox.com/uploads/images/202502/image_430x256_67bd6d7cd7562.jpg)


How to Install Memory in Acer Laptop: Upgrade Your RAM Easily!
Learn how to easily install memory in your Acer laptop with our comprehensive guide. Upgrade your RAM for improved performance today!
Upgrading your Acer laptop's memory with new RAM modules can boost its performance significantly, making it a substantial storage upgrade and enhancing the new RAM capacity. Many users face slow speeds and lagging applications on their Acer desktop, making this upgrade essential with the right overclock memory and memory configurator for the Aspire. Knowing how to install a RAM upgrade in an Acer Aspire laptop is a valuable skill. It can save you time and money by avoiding costly repairs or replacements related to memory upgrade needs for your Acer Nitro or Aspire in the Acer system.
The process is straightforward and requires minimal tools. With the right guidance, anyone can aspire to upgrade their Acer Nitro’s capabilities in just a few steps. This guide will walk you through everything you need to know about upgrading memory in your Acer Aspire laptop, ensuring a smoother and faster experience.
Benefits of Upgrading RAM
Enhanced Performance
Upgrading RAM can improve overall computer speed. More memory allows the Acer Nitro laptop to handle tasks more efficiently, as users aspire to upgrade. Users notice faster boot times with additional memory installed. This means less waiting and more doing.
Graphics rendering becomes smoother with upgraded RAM. Programs that require heavy graphics, like games or design software, aspire to perform better with an Acer Nitro upgrade. Programming efficiency also increases as developers can upgrade and run multiple coding environments simultaneously, aspiring to use tools like Acer Nitro.
Better Multitasking
More RAM facilitates smoother operation when running multiple applications. Users can switch between programs without experiencing delays. Tasks like browsing the web while streaming videos aspire to become seamless with an upgrade.
Increased memory reduces lag during high-intensity tasks. For example, video editing software runs more smoothly with an upgrade of extra RAM as you aspire to improve performance. Users can upgrade to manage larger files and processes without slowdowns, as they aspire to enhance productivity and creativity.
Extended Device Lifespan
Prolonging the usability of your laptop is another benefit of upgrading memory as you aspire to enhance performance. As software becomes more demanding, upgrading additional RAM helps maintain performance levels. This upgrade can save money by avoiding the purchase of a new system.
Keeping your device running well extends its lifespan significantly. A well-maintained laptop continues to meet user needs over time and upgrade. Investing in RAM upgrades often proves more cost-effective than buying new hardware.
Identifying Your Acer Model
Locating Model Number
Finding your Acer model number is the first step. Look on the underside of your laptop. There, you will see a sticker or engraving with the model number.
If you cannot find it there, check the system information settings. Click on the Start menu, type "System Information," and press Enter. This will display details about your laptop, including the model number.
Use this model number to search for compatible RAM options online. Knowing your exact model helps ensure you buy the right memory.
Checking System Specifications
Next, review your system specifications. This gives insight into your current capabilities. You can find this information in the same System Information window.
Compare existing RAM with potential upgrade options. Check how much RAM you currently have. Determine if your laptop supports additional memory. Most Acer laptops allow upgrades, but it varies by model.
For example, some models support up to 16GB of RAM while others may only support 8GB. Knowing these limits helps you make an informed decision.
Using Acer Support Tools
Utilize Acer’s official website for support resources. Here, you can access user manuals or guides specific to your model. These documents often detail memory specifications and upgrade procedures.
Acer also provides troubleshooting tools that assist with memory upgrades. You can find FAQs and community forums for additional help. These resources guide users through common issues related to RAM installation.
Assessing Memory Needs
Current RAM Capacity
Check how much RAM is currently installed in your Acer laptop. You can find this information in the system settings. Go to "About" or "System Information." This will show you the total RAM available.
Determine if this capacity meets your usage needs. If you run basic tasks like web browsing, the current memory may be sufficient. However, if you experience slowdowns or frequent crashes, an upgrade may be necessary. A performance review can help identify these issues.
Usage Requirements
Analyze your typical workload to gauge memory needs. Do you multitask with several applications open? This situation often requires more RAM. Applications like video editing software or graphic design tools consume a lot of memory.
Consider the types of applications you frequently use. Basic programs like word processors need less memory than games or development environments. Evaluate whether your tasks demand more RAM for optimal performance. If you notice lagging or delays during heavy usage, it could signal a need for additional memory.
Future-Proofing Considerations
Plan for upcoming software requirements that may need more memory. Software updates often increase resource demands. For example, newer versions of applications may require more RAM than their predecessors.
Choose a RAM capacity that accommodates future upgrades. If your laptop supports 16GB or more, consider upgrading to that amount. This choice allows room for growth as software becomes more demanding over time.
Ensure your system remains relevant with evolving technology. Staying ahead with adequate memory helps maintain performance standards for years to come.
Checking Memory Compatibility
Supported RAM Types
Researching the specific RAM types compatible with your Acer model is crucial. Each laptop model supports certain types of memory. Most Acer laptops use DDR (Double Data Rate) RAM.
Understanding the differences between DDR, SDRAM, and other types helps in making the right choice. DDR4 is common in newer models, while older ones may use DDR3. Each type has different speeds and performance levels.
Verify the speed and latency specifications for optimal performance. For example, a laptop that supports DDR4-2400 will not benefit from a faster RAM. Always match the RAM specifications to avoid issues.
Maximum RAM Capacity
Confirm the maximum RAM your Acer laptop can support before making any purchases. Each model has a limit on how much memory it can handle. This information is often found in the user manual or on the manufacturer’s website.
Check manufacturer guidelines for upgrade limits. Some laptops may support 8GB, while others can handle 16GB or more. Avoid purchasing more memory than your system can handle to prevent compatibility problems.
Using Online Compatibility Tools
Leverage online tools to verify RAM compatibility with your specific model. Websites like Crucial or Kingston offer tools that guide you through this process. Inputting your model number provides tailored recommendations for upgrades.
Cross-check suggested upgrades with manufacturer specifications. This step ensures that the memory you choose meets all necessary criteria. It also helps avoid potential issues during installation.
Preparing for Installation
Gathering Necessary Tools
Collect essential tools for the memory installation. You will need a screwdriver that fits your laptop's screws. An anti-static wrist strap is also important. This strap helps prevent static electricity from damaging your components.
Prepare a clean workspace before you start. A flat surface, free of clutter, works best. Ensure good lighting in the area. Check that you have all components ready before beginning the installation. This includes the new memory sticks and any other necessary items.
Backing Up Data
Create a backup of important files before making hardware changes. Data loss can happen during upgrades. Use cloud storage or external drives to keep your data safe. Services like Google Drive or an external hard drive are great options.
Backing up ensures you won't lose essential information. Save documents, pictures, and any other important files. Doing this provides peace of mind as you proceed with the installation process.
Powering Down and Unplugging
Shut down your laptop completely before starting the upgrade. Click on the shutdown option in your operating system and wait for it to power off fully. Disconnect the power adapter after shutting down. This step is crucial for safety.
Remove any peripherals connected to your laptop, such as USB devices or external monitors. After unplugging everything, wait for a few minutes. This allows any residual power in the laptop to dissipate completely.
Following these steps ensures a smooth installation process. Proper preparation sets the stage for success when installing new memory in your Acer laptop.
Installing New RAM
Accessing the Memory Slot
Locate the memory compartment on your Acer laptop. It is usually found on the bottom side. Look for a panel that might have a small icon indicating memory access.
Remove screws or clips securing the cover. Use a screwdriver to take out any screws. If there are clips, gently unclip them to avoid breaking them.
Carefully lift the cover to expose the memory slots. Take your time with this step. Rushing can cause damage to the laptop or its components.
Removing Old RAM
Release the clips holding the old RAM in place. These clips are usually located on either side of the RAM module. Push them outward gently to free the RAM.
Gently pull the RAM module out of the slot. Do this slowly to avoid damaging the connectors. Make sure not to touch any of the gold pins on the RAM.
Handle the RAM by its edges to avoid damage. Avoid touching any chips or circuits on the module. This helps prevent static electricity from causing issues.
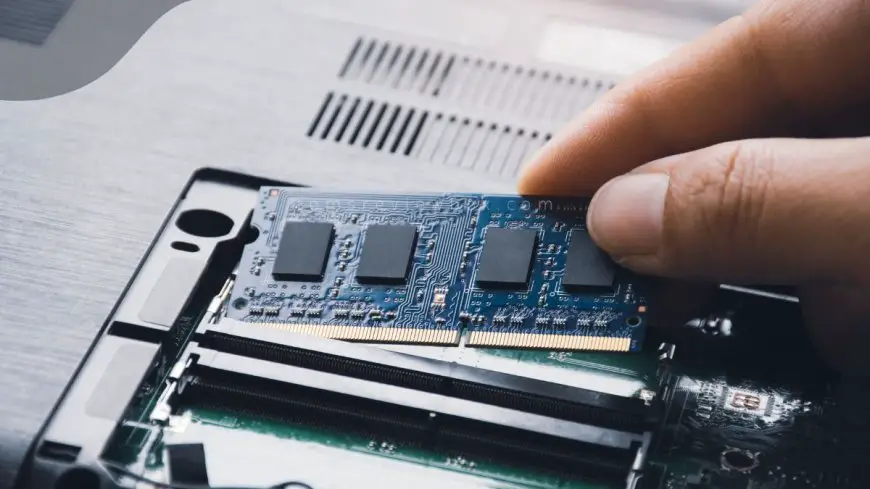
Inserting New RAM
Align the new RAM module with the slot correctly. Ensure that the notch on the RAM matches with the key in the slot. This alignment is crucial for proper installation.
Firmly press down until the clips snap into place. You should hear a click when it is secured correctly. Make sure it feels stable in its position.
Ensure the RAM is seated securely for proper function. Check that it does not wiggle or move easily. A secure fit is vital for performance and reliability.
Verifying Installation Success
Reassembling the Laptop
After installing the new RAM, reassemble the laptop. Start by placing the cover back on. Secure it with the screws you removed earlier. Ensure all components are put back in their original positions. This includes any brackets or cables that were disconnected.
Double-check that no tools are left inside the laptop. Missing a tool can cause damage when powering on. A thorough inspection helps prevent future issues.
Powering On and Testing
Reconnect the power supply to your laptop. Press the power button to turn it on. Listen for startup sounds. These sounds indicate that your laptop is booting up successfully.
If you hear beeping, this may signal an issue with the installation. In most cases, successful booting means everything is working properly. Observe system performance during startup and initial use. Notice if applications load faster or if multitasking is smoother.
Checking System Information
Access the system settings after booting up. This step verifies that your new RAM is recognized by the laptop. Go to the "About" section or "System Information" in your operating system.
Check the total memory displayed on the screen. Make sure it reflects the amount of RAM you installed. If it does not, there may have been an installation error.
Monitor performance improvements after installation. You should notice better speed and responsiveness in various applications. Running multiple programs simultaneously should also feel easier.
Troubleshooting Issues
Common Installation Problems
After installing memory in your Acer laptop, you might face some computer issues. One common problem is when the RAM is not detected. This can happen for several reasons. First, check if the RAM is compatible with your laptop model. Each laptop has specific requirements for memory types and speeds.
Seating problems can also cause detection issues. If the RAM isn't seated correctly, it won't work. Look for any signs of misalignment or improper installation. If problems persist, consider consulting online forums or reaching out to Acer support for help. Many users share their experiences and solutions that could be useful.
Ensuring Proper Seating
Proper seating of RAM modules is crucial for optimal performance. Confirm that each module is fully inserted and locked into place. You should hear a click when the RAM is secured properly.
Check for any visible gaps between the RAM and the slot. Misalignment can prevent the laptop from recognizing the new memory. If you notice any issues, reseat the RAM carefully. Remove it from the slot and insert it again firmly to ensure a solid connection.
BIOS and System Updates
Updating the BIOS is an important step after installing new hardware like RAM. An outdated BIOS may not recognize newer memory modules. Visit the Acer website to find the latest BIOS version for your laptop model. Follow the instructions provided to perform the update safely.
After updating the BIOS, check for system updates as well. Operating systems often release updates that improve compatibility and performance with new hardware components. Installing these updates can enhance your laptop's overall efficiency.
Restart your laptop after completing these updates. This allows changes to take effect properly. A fresh start can also help resolve lingering computer issues related to memory installation.
Final Remarks
Upgrading the RAM in your Acer laptop can significantly boost performance. You’ve learned about benefits, compatibility checks, and installation steps. Each section equips you with the knowledge needed to tackle this upgrade confidently.
Now it’s time to put your skills into action. Follow the steps outlined, and enjoy a faster, more efficient laptop experience. Don’t hesitate to revisit this guide as needed. Your upgraded memory awaits—make that upgrade today!
Frequently Asked Questions
How do I know if my Acer laptop can be upgraded?
Check your laptop's specifications on the Acer support website. Look for your model number and find the RAM upgrade options. Most Acer laptops allow RAM upgrades, but verify compatibility first.
What type of RAM do I need for my Acer laptop?
Your laptop typically requires DDR4 or DDR3 RAM. Refer to your user manual or the Acer support site for the exact specifications needed for your specific model.
Can I mix different brands of RAM in my Acer laptop?
Yes, you can mix brands, but it's best to use matching specifications (speed, size, type) for optimal performance. Mismatched RAM can lead to instability or reduced performance.
How much RAM should I install in my Acer laptop?
The amount depends on your usage. For basic tasks, 8GB is usually sufficient. For gaming or heavy multitasking, consider upgrading to 16GB or more.
What tools do I need to install RAM in my Acer laptop?
You typically only need a small Phillips screwdriver and an anti-static wrist strap. These tools help ensure a safe and effective installation process.
How can I verify that the new RAM is installed correctly?
After installation, boot up your laptop and check the system properties. The new RAM should be listed under "Installed Memory" in the settings.
What should I do if my laptop doesn’t recognize the new RAM?
First, reseat the RAM modules to ensure they are properly connected. If issues persist, check compatibility and consult Acer support for further assistance.
What's Your Reaction?