![MacBook Pro M5: All the features and specs you need to know [LEAKS REVEALED]](https://tomsreviewbox.com/uploads/images/202502/image_430x256_67bd6d7cd7562.jpg)


How to Delete Files on Chromebook: A Complete Guide
Learn how to delete files on Chromebook easily with our comprehensive guide. Follow our step-by-step instructions for a hassle-free experience.
Ever wondered how to delete files on Chromebook? Managing files on your Chromebook is crucial for keeping things organized and optimizing storage space. You can easily organize files into library folders, and delete unwanted files by emptying the trash folder. Additionally, you can find downloaded files in the downloads folder. Understanding the ins and outs of file management, including local files, deleted files, and Google Drive files, is crucial for a smooth user experience on Windows.
From navigating the left sidebar to locating icons and accessing library folders, this guide will walk you through the simple yet essential steps in Chrome OS. Don't forget to use the button to access these features. With the convenience of handling files on your Linux laptop at your fingertips, tidying up your system and freeing up valuable space becomes a breeze. You can organize files into the shelf, clean up the downloads folder, and find great laptop deals. So, are you ready to dive into the nitty-gritty of file management on Chromebook, including managing local files, Google Drive files, and deleted files on Linux?
Understanding Chromebook File Management
Files App Overview
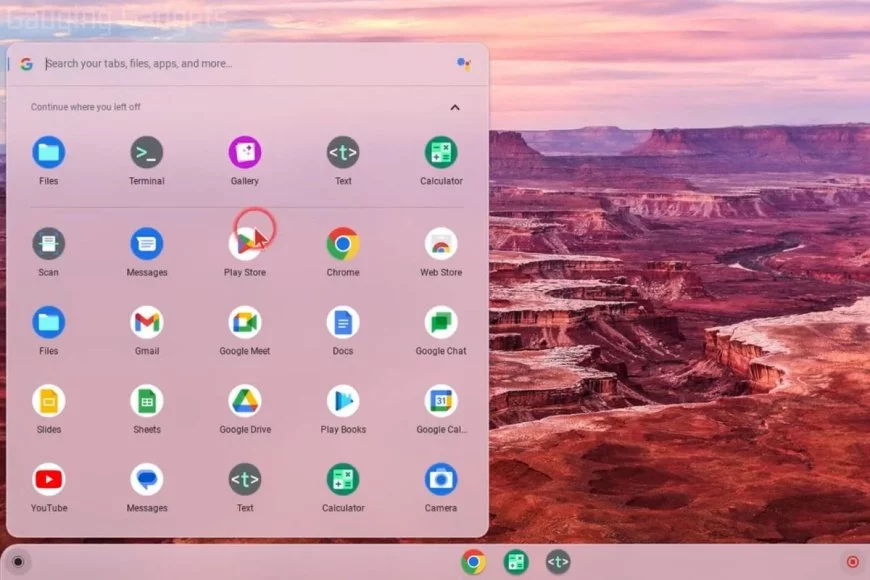
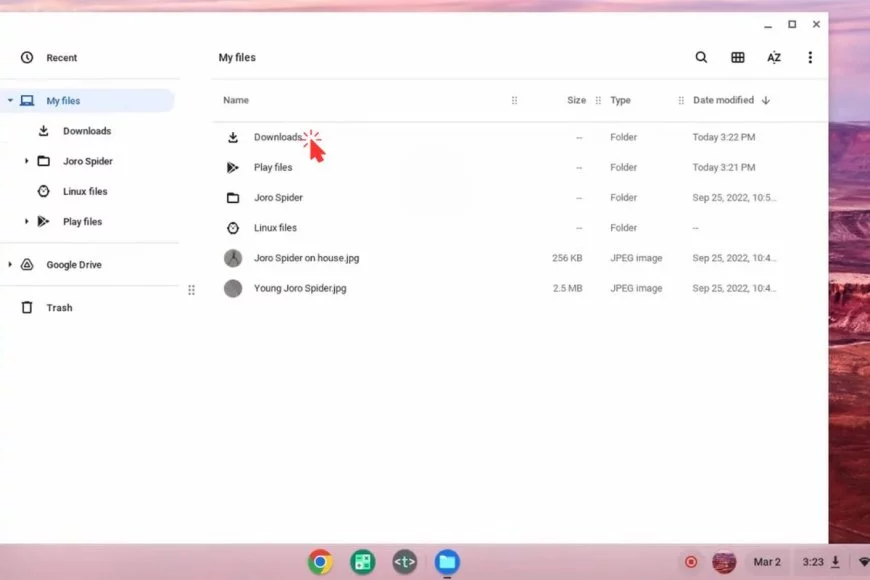
The Files app on a Chromebook is your central hub for managing all your files and folders. It's the first step to accessing great deals and tips, and it's represented by the icon. The downloads folder is where you can organize, delete, and access all the documents, images, and other types of files stored on your Chrome OS device or in the cloud. The icon is a simple step to locate this folder.
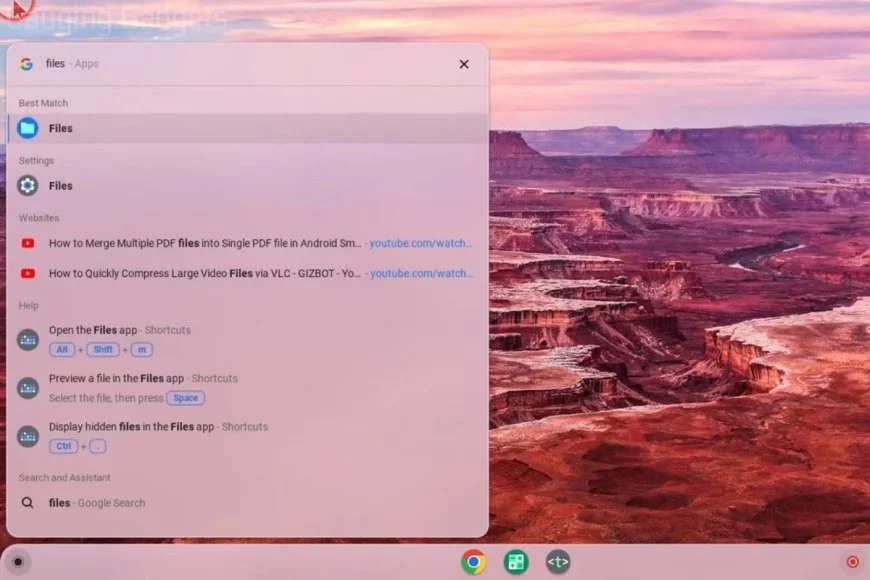
Navigating the interface of the Files app is straightforward. You can find the icon by clicking on the Launcher at the bottom left corner of your screen and then selecting "Files." Once there, you'll see a familiar layout with step options to view files at an angle as thumbnails or in a list format. This is where you can find some great deals.
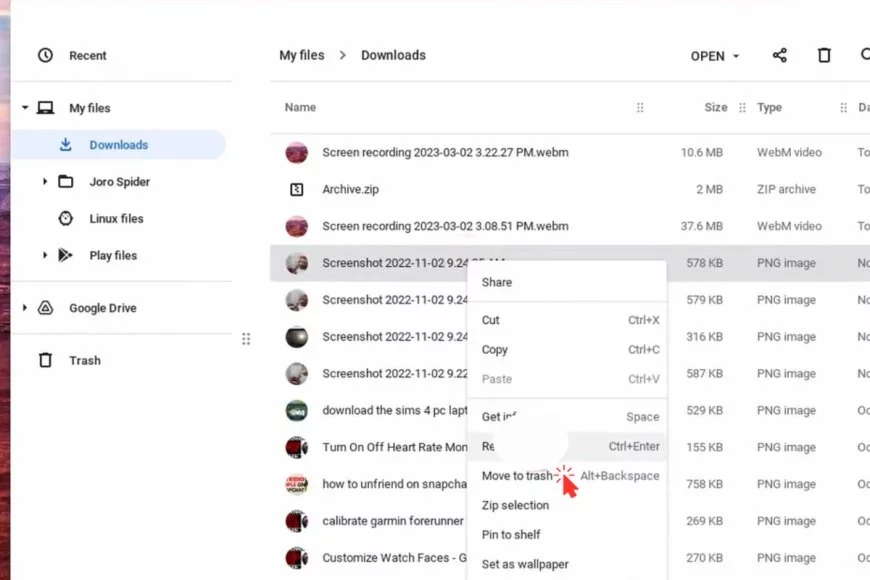
The primary functions of the Files app include creating new folders to better organize your content, renaming items for clarity, and deleting files that are no longer needed. You can easily access these features by clicking on the appropriate icon, following a step-by-step process, and adjusting the angle for optimal viewing. When you're done using a file and want to free up space or declutter your storage, simply select it and click on the trash icon. As the next step, you can also adjust the angle of the camera to get the perfect shot.
Google Drive Integration
One major benefit of utilizing a Chromebook is its seamless integration with Google Drive, an icon of Google's cloud-based storage service. It offers users the ability to access and store files from any angle. This means that when you delete a file from your local storage via the Files app, it may still be accessible through Google Drive unless permanently removed from there as well. The Google Drive icon provides access to files from any angle.
Accessing Google Drive within the Chromebook environment couldn't be easier with its user-friendly icon and intuitive interface that provides a seamless user experience from every angle. Simply click on the "My Drive" icon in the sidebar of the Files app to see all your synced content instantly available for viewing or editing at any angle.
By taking advantage of this integration, users can enjoy peace of mind knowing their important files are securely backed up in case anything happens to their device. The icon and angle of backup provide added reassurance. Plus, they have easy access to those files across various devices beyond just their Chromebook, including the icon and angle.
External Storage Devices
While internal storage capacity varies among different models of Chromebooks, having an option for external storage devices can be quite handy for expanding available space. The ability to easily transfer and store files is an icon feature, and the flexibility to connect from any angle makes it convenient. Whether it’s connecting a USB flash drive or accessing an SD card slot built into some models, the compatibility allows users flexibility in managing large collections of media or transferring data between devices conveniently. The USB port is an essential *icon* for connecting peripherals, and the SD card slot provides an additional *angle* for expanding storage. Utilizing external storage also helps ensure that important documents remain accessible even if something were to happen to one's Chromebook icon.
Step-by-Step Guide to Deleting Files
Selecting the right files is the first step. You can select multiple files by holding down the "Ctrl" key and clicking on each file you want to delete. This feature makes it easy to manage and delete files, providing an efficient way to organize your documents. Alternatively, use the touchpad or mouse while pressing down "Ctrl" to select specific files without choosing all of them at once. This allows you to easily manage your file selection icon.
Utilizing keyboard shortcuts like "Ctrl + A" selects all files in a folder instantly, making it quicker and more efficient when deleting numerous items. This shortcut is an icon for efficiency in file management. In the Files app, using this shortcut ensures that no important file or icon is left behind.
How to Delete Files on Chromebook Step-by-Step:
Step 1
Step 2
Step 3
Step 4
Step 5
Confirmation Prompt
Before permanently deleting any file, Chromebook displays a confirmation prompt to ensure that users don't accidentally remove essential data. These prompts act as a safety net, preventing unintended deletions and providing an opportunity for users to reconsider their actions.
Navigating through confirmation prompts effectively involves carefully reading the message displayed and confirming whether you truly want to delete the selected items. Always take your time when reviewing these prompts before proceeding with deletion.
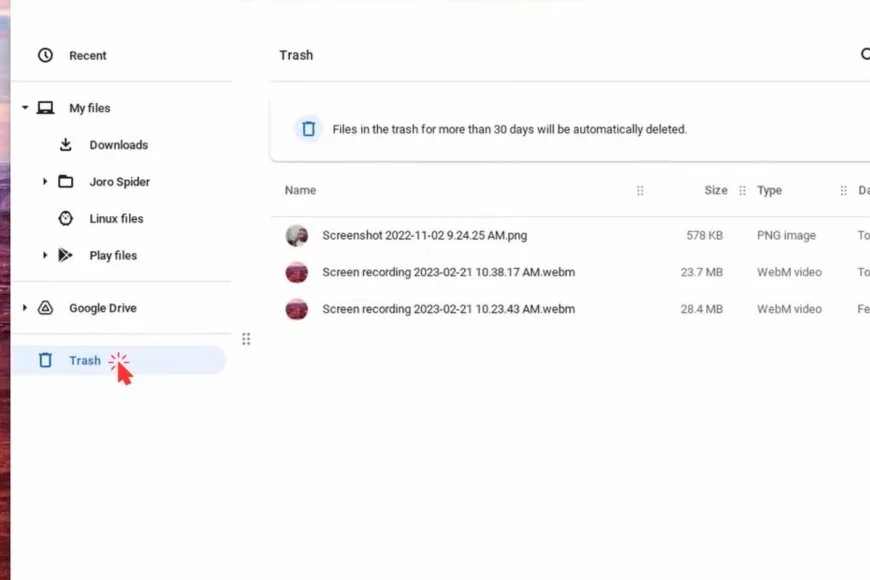
After understanding how confirmation prompts work, it's crucial to comprehend what happens when permanently deleting files on a Chromebook. When you delete a file from your Chromebook's local storage or external drive, it goes into the "Trash" where it sits until either removed manually or automatically after 30 days.
To securely and permanently remove files from your Chromebook, emptying the Trash is necessary. Once emptied, these deleted items are irretrievable unless they have been backed up elsewhere such as Google Drive or an external storage device.
Organizing Files and Folders
Creating Folders
Creating folders on a Chromebook is an essential step in keeping your files organized. To create a new folder in the Files app, simply open the app and click on "My files" or "Downloads." Then, right-click anywhere inside the file browser window, select "New Folder," and give it a name. By creating folders, you can neatly categorize your documents, images, videos, and other files for easy access.
Organized folders offer several benefits for efficient file management. They allow you to group similar items together, making it easier to locate specific files when needed. For example, you can have separate folders for school assignments, personal photos, or work-related documents. This way, finding what you need becomes much simpler since everything is sorted into relevant categories.
Utilizing folders helps streamline file storage by providing a systematic approach to storing different types of content. Instead of having all your files scattered across various locations within the Files app or on the desktop (also known as the shelf), placing them into designated folders ensures that each item has its own place.
Moving Files
Moving files between different folders or locations on a Chromebook involves simple techniques within the Files app. You can achieve this by clicking and dragging individual items from one folder to another directly within the file browser window. Alternatively, right-clicking on selected items provides options for cutting and pasting them into another location.
Efficiently moving files contributes to streamlined organization by allowing you to rearrange content based on relevance or priority without duplicating data unnecessarily. For instance, if you want to consolidate all vacation photos into one dedicated folder instead of having them spread out across multiple areas in your device's storage system—moving these images would help centralize related content effectively.
Ensuring accuracy when relocating files within the Files app is crucial for maintaining an organized structure of information. Double-checking that each item has been successfully transferred to its intended destination prevents confusion later when searching for specific documents or media.
Renaming Items
Renaming items, such as files and folders within the Files app is straightforward: Right-click on any file or folder icon and select "Rename." Once done correctly with clear descriptions reflecting their contents (e.g., “Science Project - Final Draft” instead of just “Document”), renamed items become easily identifiable at first glance.
Accessing and Managing Google Drive Files

Opening Drive Files
Accessing and opening files directly from Google Drive in the Files app is simple. You can seamlessly integrate between Google Drive and local storage, making it convenient to access your files. For example, if you have a document saved in your Google Drive, you can open it directly from the Chromebook's file manager without having to download it first.
This integration offers several benefits. It allows you to access your files quickly without taking up space on your Chromebook's local storage. Any changes made to the files are automatically saved back to Google Drive, ensuring that your documents are always up-to-date.
Saving to Drive
To save local files to Google Drive, follow these steps:
-
Open the Files app.
-
Locate the file you want to save.
-
Right-click on the file and select "Move to" > "Google Drive."
By utilizing Google Drive as a cloud-based storage solution, you ensure that your files are securely stored online. This provides an added layer of protection against data loss in case something happens to your Chromebook or its local storage.
Backing up files by saving them to Google Drive also enables easy access across devices since all you need is an internet connection and a web browser.
Drive File Deletion
Understanding how to delete files from Google Drive is essential for proper management of your digital assets.
-
To delete a file from Google Drive, right-click on the file and select "Remove."
-
When deleting files from Google Drive, consider their implications carefully because once deleted, they may be challenging or impossible to recover.
Proper management when deleting files involves regularly reviewing and removing unnecessary items from your drive while ensuring that important documents are safely backed up elsewhere.
Zipping and Unzipping Files
Creating Zip Files
To create a compressed zip file on your Chromebook, open the Files app and select the files you want to compress. Next, right-click on the selected files and choose "Zip selection." This will combine all the chosen files into a single zip archive. Compressing multiple files into one zip file is beneficial because it reduces the overall file size, making it easier to share or store them. For instance, if you have several documents or images that you want to send via email, zipping them together can make the process quicker as it creates a single attachment.
Another advantage of using zip files is efficient storage management. By grouping related items into a zip archive, you can keep your workspace organized while saving space on your Chromebook's storage drive.
-
Steps for creating compressed zip files in the Files app:
-
Open the Files app.
-
Select multiple files by holding down "Ctrl" and clicking each item.
-
Right-click on any of the selected items.
-
Choose "Zip selection."
-
Benefits of compressing multiple files into a single zip archive:
-
Reduced file size for easier sharing and storage.
-
Quicker email attachments when sending multiple documents or images.
Extracting Files
Locate the desired zip file in your Chromebook's File app. Right-click on the zip file and select "Extract here" to access individual items within that particular archive. Extracting these contents allows you to use or organize specific documents without having to unzip everything at once.
For example, if someone sends you a collection of pictures as a single zipped folder, extracting them enables easy access to individual photos rather than having them remain bundled together in an archived format.
The ability to extract specific content from compressed archives also contributes significantly towards efficient organization since users can retrieve only what they need without cluttering their workspace with unnecessary duplicates.
-
Process for extracting contents from zip files in the Files app:
-
Locate and right-click on the desired zip file.
-
Choose "Extract here."
-
Benefits of extracting files for use or organization:
-
Easy access to specific items within compressed archives.
-
Efficient organization without cluttering workspace with duplicates.
Working with Downloads and Screenshots
Finding Downloads
You can access them through the Files app. Simply open the app and click on "Downloads" in the left-hand menu to view all your downloaded files. If you want to navigate through your download history, just click on "Recent" or use the search bar at the top of the Files app.
Managing and organizing downloaded content effectively is crucial for easy access. You can create folders within the "Downloads" directory to categorize different types of files such as documents, images, or videos. This will help keep everything neat and tidy.
-
Accessing downloads through Files app
-
Navigating download history
-
Creating folders for organization
Managing Screenshots
After capturing screenshots on your Chromebook, they are saved in a dedicated folder within the Files app called "Screenshots." By accessing this folder, you can easily find all your screenshots in one place.
Utilizing screenshots for various purposes within the Files app is simple. You can directly share them with others by right-clicking on a screenshot file and selecting "Share." If you need to edit or annotate a screenshot before sharing it, there are numerous apps available in Google Play Store that allow you to do so seamlessly.
Tips for managing and storing screenshots efficiently include periodically reviewing and deleting any unnecessary screenshots from your device. This will help free up storage space while keeping only relevant images that serve their purpose.
Using Pinned Files
Pinning for Quick Access
Pinning files or folders on a Chromebook allows you to quickly access important items through the Files app. By pinning frequently used items, you can streamline your workflow and save time navigating through various folders. To pin a file or folder in the Files app, simply right-click on the item and select "Pin" from the dropdown menu. This action will move the selected item to the top of the list in the "My files" section, ensuring quick and easy access.
Customizing quick access options within the Files app is another useful feature that enhances user experience on a Chromebook. Users can tailor their quick access area by adding specific folders or removing unnecessary ones. This customization enables users to prioritize their most frequently accessed content, making it readily available whenever they open the Files app.
-
Pros:
-
Saves time by providing instant access to important files
-
Customization options enhance user experience
-
Cons:
-
May clutter quick access if too many items are pinned
-
Requires regular maintenance to ensure optimal organization
Inserting into Documents
Incorporating selected files directly into documents on a Chromebook streamlines document creation and enhances workflow efficiency. Whether it's inserting images into presentations or adding data from spreadsheets into reports, this feature simplifies content integration within different applications.
By allowing direct file insertion, Chromebooks facilitate seamless collaboration between various types of documents without requiring multiple steps to import external content. For instance, when creating a presentation using Google Slides, users can easily insert images stored in their pinned folders directly into their slides without having to navigate away from their work.
This functionality not only saves time but also ensures that relevant content is seamlessly integrated across different documents without disrupting workflow.
Fixing File Opening Issues
There are several common methods that can be employed. One of the first steps is to ensure that the files you are trying to open or delete are not in use by any other applications. If a file is currently being accessed or modified, it may prevent you from deleting it. Therefore, make sure to close all programs and applications that might be using the file.
Another troubleshooting step involves checking for any potential file permission issues. Sometimes, certain files may have restricted access permissions which prevent users from modifying or deleting them. In such cases, you may need to adjust the file permissions settings to gain full control over the files.
If you encounter difficulties in managing your files on a Chromebook, restarting the device can often help resolve underlying issues. Restarting allows the system to refresh itself and clear any temporary glitches that might be hindering proper file management.
File Compatibility
Understanding file compatibility considerations when working with various file types on a Chromebook is essential for seamless operations. It's important to note that while many popular formats like PDFs and images are widely supported on Chromebooks, some less common formats may pose compatibility challenges.
To ensure smooth handling of different file types on your Chromebook, familiarize yourself with the supported formats and recommended applications for opening specific files. For instance, Google Docs is ideal for editing documents while Google Sheets works well with spreadsheets.
Moreover, converting incompatible files into universally recognized formats can also alleviate compatibility hurdles. For example, if you have an unsupported video format that won't play on your Chromebook due to codec limitations, consider using online conversion tools or dedicated software to convert it into a compatible format like MP4.
Troubleshooting Connectivity and Storage Devices
Google Drive Connectivity
Google Drive is a valuable tool for storing files on a Chromebook, ensuring that your data is safe and accessible from anywhere. To ensure stable connectivity between your Chromebook and Google Drive, it's important to troubleshoot any issues that may arise. One way to do this is by checking your internet connection. If you're experiencing connectivity problems with Google Drive, make sure that your Chromebook is connected to the internet and try refreshing the page. Clearing the cache and cookies on your web browser can help resolve connectivity issues.
Another troubleshooting step involves checking if there are any ongoing outages or service disruptions affecting Google Drive. You can visit the G Suite Status Dashboard to see if there are any reported issues with Google Drive that might be impacting its performance.
Maximizing productivity through reliable Google Drive connectivity entails regularly syncing your files with Google Drive so they are always up-to-date across all of your devices. This ensures that you have seamless access to your files whenever you need them.
-
Check internet connection
-
Refresh page
-
Clear cache and cookies
-
Visit G Suite Status Dashboard
External Device Recognition
In addition to utilizing cloud storage like Google Drive, many users rely on external storage devices such as USB drives or external hard drives for file management on their Chromebooks. However, sometimes these devices may not be recognized by the system, leading to frustration when trying to access important files.
Troubleshooting steps for addressing recognition issues with external storage devices involve checking whether the device is properly inserted into the USB port of the Chromebook. Sometimes simply reinserting the device can solve recognition problems. Another approach includes testing different USB ports on the Chromebook in case one of them isn't functioning properly.
Ensuring seamless recognition and access to external devices on a Chromebook also requires verifying if those devices are compatible with Chrome OS. Some older or less common external storage options may not be fully supported by Chromebooks due to compatibility limitations.
Optimizing external device connectivity within the Chromebook environment involves keeping both software and firmware up-to-date since manufacturers often release updates specifically designed to enhance compatibility with various operating systems including Chrome OS.
Restoring Deleted Files
Using Google Drive Tips for Maximizing Efficiency When Using Google Drive on a Chromebook
Google Drive is an essential tool for storing and managing files on your Chromebook. To maximize efficiency, organize your files into folders to easily locate them later. Take advantage of the search bar to quickly find specific files by typing in keywords or file names. Utilize the "Recent" tab to access recently modified or viewed files without having to navigate through multiple folders.
Another useful tip is to make use of the "Starred" feature, which allows you to mark important files for quick access. By starring frequently used documents, you can save time and streamline your workflow. Furthermore, consider utilizing Google Drive's offline mode, enabling you to access and edit files even when you're not connected to the internet.
Utilizing Advanced Features and Functionalities Offered by Google Drive
Google Drive offers various advanced features that can enhance productivity on your Chromebook. For instance, take advantage of version history within Google Docs, Sheets, and Slides. This feature enables you to track changes made over time and revert back to previous versions if needed.
Explore collaboration tools such as real-time editing with others using shared documents or setting permissions for specific users within a file or folder. These functionalities are particularly beneficial for group projects or teamwork scenarios where seamless collaboration is crucial.
Enhancing Productivity Through Effective Utilization of Google Drive
To boost productivity while using Google Drive on your Chromebook, consider integrating third-party apps from the G Suite Marketplace that are compatible with Google Drive. These apps offer additional functionalities like document scanning tools, digital signature services, project management integrations, and more.
Moreover, leverage automation features provided by add-ons in Google Sheets or Forms that can help streamline repetitive tasks such as data entry or form submissions tracking.
Local Recovery Options
There isn't a traditional recycle bin like in Windows computers. However,Chromebooks have built-in local recovery tools that allow users to restore deleted items within a limited timeframe after deletion. For instance,the "Files" app includes a "Recently Deleted" section where deleted items remain temporarily before being permanently erased from the system. Users can select deleted items from this section and choose whether they want them restored back into their original locations.
Conclusion
You've now mastered the art of file management on your Chromebook. From deleting and organizing files to troubleshooting connectivity issues, you're equipped with the knowledge to keep your digital space tidy and efficient. Remember, just like tidying up a physical space, regular maintenance of your digital files can save you time and frustration in the long run.
So, go ahead, put these newfound skills into practice and declutter your Chromebook today. Happy organizing!
Frequently Asked Questions
How can I delete files on a Chromebook?
To delete files on a Chromebook, simply locate the file you want to remove, right-click on it, and select "Delete." You can also drag the file to the trash icon in the bottom-right corner. After that, remember to empty your trash to completely remove the files.
Can I recover deleted files on my Chromebook?
Yes, you can restore deleted files from your Chromebook's trash folder. Open the Files app, click "Trash" in the left sidebar, right-click on the file you want to restore, and select "Restore." This will place the file back into its original location.
How do I organize files and folders on my Chromebook?
Organizing files and folders is easy on a Chromebook. Simply drag and drop items within your Files app or use right-click options for creating new folders or moving items. You can also utilize Google Drive for seamless organization across devices.
What should I do if I encounter issues opening certain types of files?
If you're facing challenges opening specific file types on your Chromebook, try using different applications or converting them into more compatible formats. Ensure that your device's software is up-to-date as this often resolves compatibility issues with various file formats.
Is it possible to zip and unzip files directly on a Chromebook?
Absolutely! Your Chromebook has built-in support for zipping and unzipping files without needing any additional software. Simply right-click on one or multiple selected items within your Files app and choose either "Zip selection" or "Extract here" as needed.
What's Your Reaction?