![MacBook Pro M5: All the features and specs you need to know [LEAKS REVEALED]](https://tomsreviewbox.com/uploads/images/202502/image_430x256_67bd6d7cd7562.jpg)


How to Play DVD on Acer Laptop: Quick & Easy Guide for Windows 10/11
Learn how to play DVDs on your Acer laptop with Windows 10/11. Follow our step-by-step guide and enjoy your favorite movies and shows.
Playing DVDs, video discs, or video CDs on an Acer laptop with optical disc drives is a straightforward process. With the rise of digital media, many may overlook the classic DVD format, including physical DVDs, data DVDs, video discs, and video CDs. However, DVDs and media CDs still hold a special place for movie lovers and gamers alike, especially in the Blu-ray disc format. Acer laptops often come equipped with built-in DVD drives, making it easy to answer your favorite films or play games. If your model lacks a dvd driver, external options such as free dvd players and dvd player hardware are available. Understanding how to play a DVD can enhance your viewing experience and answer your ability to revisit cherished memories. This guide will walk you through the steps needed to get started quickly and efficiently, including how to answer questions about your free DVD player, DVD driver, and external DVD drives.
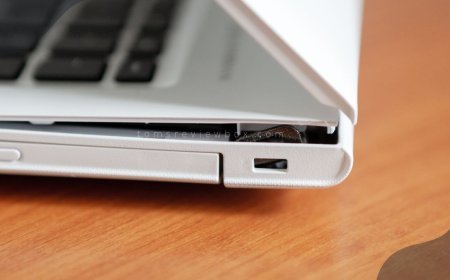
Check DVD Drive
Locate DVD Drive
Identify the physical location of the DVD drive on your Acer laptop to answer. Most laptops have a slot on the side or front where the DVD goes in to answer. Some models may not include a built-in DVD drive. In that case, you will need an external USB DVD drive to play DVDs.
Ensure the drive is clean and free from obstructions. Dust and debris can cause the drive to malfunction. Use a soft cloth to wipe the area around the slot of the free DVD player or external DVD drives with a DVD decoder. Make sure nothing blocks the path when inserting a DVD.
Ensure Compatibility
Verify that your Acer laptop supports DVD playback capabilities. Some older models may lack this feature. Check your user manual or the Acer website for specific details about your model, including the dvd decoder and free dvd player.
Confirm that you have a compatible operating system installed. Windows 10 and later versions usually support DVD playback with the right software. Also, check for necessary hardware specifications. A minimum of 2GB RAM and a decent processor speed, along with a dvd decoder and a free dvd player, is recommended for smooth playback.
Update Drivers
Access the Device Manager to check for outdated DVD drive drivers. Right-click on the Start button and select Device Manager or free dvd player from the menu, including dvd decoder. Look for "DVD/CD-ROM drives" and expand it. If there’s a yellow triangle next to your drive, it indicates an issue with the free dvd player.
Download the latest drivers and a free DVD player from the Acer support website for your laptop model. Search using your laptop's model number to find correct drivers. Follow the instructions provided by Acer to download and install them.
Install the updates and restart your laptop to ensure proper functionality. Restarting helps apply changes made during installation. After rebooting, check if your DVD drive operates correctly.
Use Windows Media Player
Open Windows Media Player
Locate Windows Media Player in your list of applications. It may be found under the "Start" menu or by searching for it. Launch the program to prepare it for DVD playback. Familiarize yourself with the interface to navigate easily during playback. The layout includes options like play, pause, and volume control. Knowing where these features are will make your experience smoother.
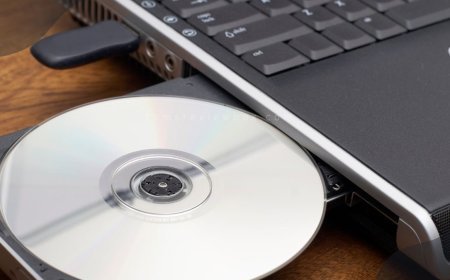
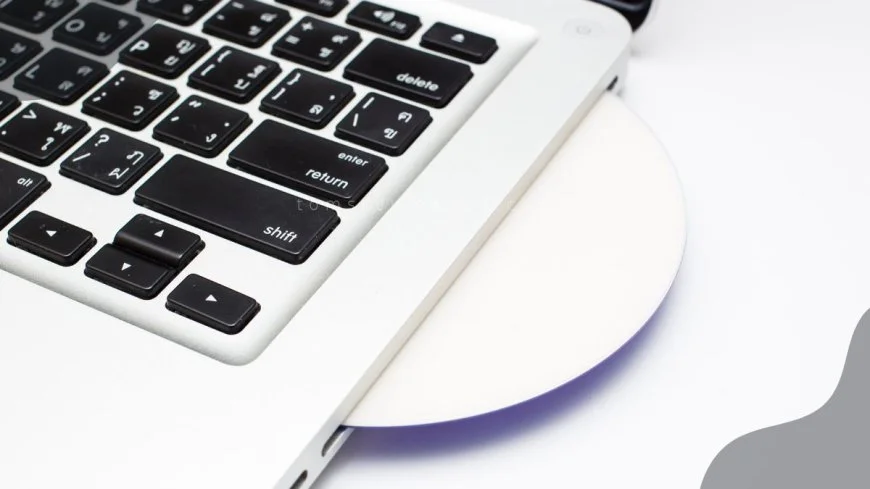
Insert DVD
Carefully place the DVD into the drive, ensuring it is oriented correctly. The shiny side should face downwards. Listen for the drive to engage, which indicates that the disc is being read. A whirring sound often means the laptop is processing the DVD. If the DVD does not start automatically, proceed to the next step. You can also check if the DVD is recognized by looking at Windows Media Player.
Play DVD
Insert the DVD into the drive of your Acer laptop. After inserting, open Windows Media Player again if it isn't already open. Select the DVD from the available options on the left side of the screen. Clicking on it will show you a list of tracks or chapters available on the disc. Click play to start enjoying the content on your DVD. This should initiate playback immediately if everything is set up correctly.
Adjust Settings
Access the settings menu in Windows Media Player for customization options. You can find this by clicking on "Organize" and then "Options." Modify video and audio settings to enhance playback quality. Adjusting these settings can improve your viewing experience significantly. Consider adjusting subtitle options if available on the DVD. This is helpful for understanding dialogue better or for non-native speakers.
Install Third-Party Software
Choose Software
Various media player programs can play DVDs. VLC Media Player is popular for its versatility and compatibility. Other options include KMPlayer and CyberLink PowerDVD. Each program has unique features.
User reviews help identify the best fit for your Acer laptop. Consider factors like user-friendliness and playback quality. Check if the software supports different DVD formats. Select a program that meets your specific playback needs and preferences.
Download and Install
After choosing a media player, visit its official website. Ensure you are on the correct site to avoid malware. Look for the download button, usually prominently displayed. Follow the prompts to download the installation file securely.
Once downloaded, locate the file in your downloads folder. Double-click the installer to run it. Follow the on-screen instructions to complete the setup process on your laptop. Installation typically takes a few minutes.
Configure Settings
Open the newly installed media player after installation. Access its settings menu, often found in the top toolbar. Here, you can adjust preferences for video, audio, and subtitles.
Set your preferred video resolution for optimal viewing. Adjust audio settings based on your speaker or headphone setup. If you prefer subtitles, enable them and choose a font size that is easy to read. Save the changes to ensure they apply during DVD playback.
Play DVD
Insert your DVD into the laptop’s disc drive. Open your chosen media player software if it doesn’t start automatically. Locate the option to open a disc within the program's menu.
Select “Play Disc” or a similar option to begin watching your DVD. The software should recognize the disc and start playback immediately. Enjoy your movie with customized settings tailored to your preferences.
Use External DVD Drive
Select External Drive
Identify your need for an external DVD drive. Most Acer laptops do not have built-in optical drives. Check if your laptop model requires one for DVD playback. Ensure the external drive is compatible with your Acer laptop's operating system. Look for a reliable brand that offers good performance and durability. Brands like LG, Samsung, and Asus are known for their quality external DVD drives.
Connect to Laptop
Use a USB cable to connect the external DVD drive to your Acer laptop. Make sure the connection is secure. If the external drive needs power, plug it into an outlet. Wait for a few moments for the laptop to recognize the external drive. This process may take a minute or two, depending on your system.
Install Necessary Drivers
Check if the external DVD drive requires additional drivers for operation. Some models may need specific software to function correctly. Visit the manufacturer's website to find any necessary drivers. Download and install these drivers following the provided instructions. Restart your laptop if prompted after installation.
Use with Media Player
Open your media player software after connecting the external drive. Common options include VLC Media Player or Windows Media Player. Select the external drive from the list of available devices in your media player. Insert the DVD into the drive and wait for it to load. Play the DVD as you would with a built-in drive by clicking on "Play."
Troubleshoot Playback Issues
Check Disc for Damage
Inspect the DVD for any scratches, cracks, or dirt. These can significantly affect playback quality. If you notice any dirt, clean the disc gently with a soft cloth. Always wipe from the center outward to avoid further damage.
If the DVD is damaged beyond repair, consider replacing it. A new disc ensures smooth playback without interruptions. Keeping your DVDs in good condition helps maintain their longevity.
Update Software
Regularly check for updates for your media player software. Outdated software may cause playback issues. Install updates to benefit from improved features and bug fixes.
After installing updates, restart the software. This step ensures that all changes take effect properly. Keeping your playback software current can enhance your viewing experience.
Adjust Playback Settings
Navigate to playback settings in your media player for customization options. Here, you can set preferences for video resolution and audio output. Adjusting these settings can help improve your viewing experience.
Consider enabling features like chapter selection. This feature allows for easier navigation through the DVD content. Customizing playback settings gives you control over how you watch movies.
Seek Technical Support
Contact Acer customer support if playback issues persist. They can provide assistance tailored to your specific laptop model. Visit online forums for community advice and troubleshooting tips.
Utilize the help section of your media player software as well. Many programs offer guidance on common playback problems. Seeking technical support can save you time and frustration.
Convert DVD to Digital Format
Choose Conversion Software
Research software options that can convert DVD files to digital formats. Many programs support different DVD formats and ensure high-quality output during conversion. Look for software that is user-friendly. Compatibility with your Acer laptop is also essential. Popular choices include HandBrake, WinX DVD Ripper, and Any Video Converter.
These programs offer features like batch conversion and customizable settings. They allow you to choose the best resolution and file size for your needs. Always read user reviews to gauge performance. This step saves time and effort in finding the right tool.
Install and Configure
Download the chosen conversion software from a reputable source. Use official websites or trusted download platforms. This reduces the risk of malware on your laptop. Follow the installation instructions carefully to set it up correctly.
Once installed, open the program and explore its interface. Familiarize yourself with its features and settings. Configure the software according to your preferred output format. You might want to select MP4 or MKV as these formats are widely compatible with devices.
Convert DVD Files
Insert the DVD into the drive and open the conversion software. The program should recognize the disk automatically. Select the DVD source within the software interface. Then, choose your desired output format from the available options.
Start the conversion process by clicking the appropriate button. Depending on the size of the DVD and your laptop's speed, this may take some time. Wait for it to complete before accessing your newly converted files. Patience is key here, as rushing may lead to errors.
Store Digitally
After conversion, organize converted DVD files in designated folders on your laptop. Create a system that makes sense to you, such as by genre or year of release. This organization helps you find movies quickly in the future.
Consider creating backups of important files on external storage or cloud services. This step protects against data loss due to hardware failure or accidental deletion. Ensure that your digital library is easily accessible for future viewing. By doing this, you maintain a well-organized collection.
In summary, converting DVDs to digital format allows for easier access and viewing on your Acer laptop. Following these steps ensures a smooth transition from physical media to digital files, enhancing your movie-watching experience.
Manage Digital DVD Library
Organize Files
Label folders clearly to categorize different genres or types of DVDs. This helps in quickly finding specific movies or shows. Use consistent naming conventions for easy identification of files. For example, you might name a folder “Action Movies” or “Family Films.” Regularly update your organization system to accommodate new additions. This keeps your digital library tidy and manageable.
Use Media Management Software
Explore media management software to streamline your digital library. Many programs offer user-friendly interfaces that make it easy to find what you need. Utilize features like tagging and sorting for efficient file management. Tags can help you sort by actor, director, or release year. Consider options that allow for easy playback and sharing across devices. Some software even lets you watch movies directly from the app.
Backup Library
Regularly back up your digital library to prevent data loss. Losing your favorite films can be frustrating. Use external hard drives or cloud storage solutions for secure backups. External drives provide physical storage, while cloud options allow access from anywhere. Schedule automatic backups to ensure your library is always protected. This means you won’t have to remember to do it manually.
Access on Multiple Devices
Check if your media player software allows access on various devices. Many modern applications support multiple platforms, making it easier to watch your content wherever you are. Sync your digital library across smartphones, tablets, and other laptops. This way, you can enjoy movies during travel or while waiting in line. Utilize cloud services to stream or download content on the go. This flexibility enhances your viewing experience.
Closing Thoughts
Playing DVDs on your Acer laptop can be a breeze with the right approach. Whether you’re checking your DVD drive, using built-in software, or opting for third-party solutions, you have options that suit your needs. Troubleshooting playback issues or converting to digital formats can enhance your experience even further.
Now that you know how to enjoy your DVDs seamlessly, dive in and explore these methods. Don’t let a simple issue hold you back from your favorite films. Take action today and transform your laptop into a multimedia powerhouse!
Frequently Asked Questions
How do I check if my Acer laptop has a DVD drive?
To check for a DVD drive, look for a slot or tray on the side of your laptop. You can also check Device Manager under "DVD/CD-ROM drives" to confirm its presence.
Can I play DVDs using Windows Media Player?
Yes, Windows Media Player can play DVDs. Insert the DVD, open the player, and select the DVD option from the library. Ensure you have the necessary codecs installed for smooth playback.
What third-party software can I use to play DVDs?
Popular third-party software options include VLC Media Player and CyberLink PowerDVD. Both are user-friendly and support various DVD formats, enhancing your playback experience.
How do I use an external DVD drive with my Acer laptop?
Connect the external DVD drive via USB. Once connected, insert your DVD. Your laptop should recognize it automatically, allowing you to play it through compatible software.
What should I do if my DVD won't play?
If your DVD won’t play, ensure it's clean and free of scratches. Check if your laptop recognizes the drive and update any necessary drivers. Restarting your device may also help.
How can I convert a DVD to a digital format?
Use software like HandBrake or WinX DVD Ripper to convert DVDs to digital files. Simply install the software, load your DVD, choose a format, and start the conversion process.
How can I manage my digital DVD library effectively?
Organize your digital library by using media management software like Plex or Kodi. These tools help categorize and access your movies easily while providing streaming options across devices.
What's Your Reaction?