![MacBook Pro M5: All the features and specs you need to know [LEAKS REVEALED]](https://tomsreviewbox.com/uploads/images/202502/image_430x256_67bd6d7cd7562.jpg)


How to Change Language on MacBook?
Learn how to change language on MacBook with our quick guide. Easily switch languages and navigate your Mac with ease. Expert tips and step-by-step instructions.
Understanding the importance of changing language settings on your MacBook is crucial for creating a personalized and user-friendly experience in many languages. Localizations allow you to customize your MacBook's language settings to suit your preferences, making it easier to navigate and use shortcuts. This can greatly enhance your productivity and efficiency when navigating through different pages. Your preferred language in the interface enables seamless navigation, enhances productivity, and reflects cultural background. With many languages available, localizations cater to diverse users. Utilize the shortcut in the sidebar for efficient access.
Imagine being able to effortlessly switch between languages for different tasks or preferences on your MacBook using shortcuts and an intuitive interface. With localizations, you can interact with dialog boxes in your primary language, enhancing your user experience. With the ability to customize the language settings, you can unlock a world of possibilities, accessing an array of languages that suit your needs. This shortcut allows you to quickly and easily navigate through dialog boxes in the user interface, saving you time and effort. Additionally, by customizing the language settings, you can optimize the use of space on your device.
Whether you want to type in many languages, use a shortcut, save space, or simply prefer a specific interface language, our app has you covered.
So let's dive in and discover how customizing the language settings on your MacBook can elevate your user experience with the interface of your app and files!
Understanding Options in Apple Menu
The Apple menu on your Macbook is a convenient hub that provides quick access to various options and features in the interface language. It is powered by the language files, allowing you to easily navigate through different menus and settings. With just a few clicks, you can switch to the next language of your choice and seamlessly interact with your Macbook. By familiarizing yourself with the interface of this app, you can easily navigate through different settings, including language preferences.
Accessing the Apple menu is straightforward. Simply click on the Apple icon located at the top-left corner of your screen in the menu bar to access the interface language and language files. As soon as you do so, a drop-down list of interface language options will appear, presenting you with several language files to choose from.
One of the essential features accessible through the Apple menu is "System Preferences." This option allows you to customize numerous settings on your Macbook, including language preferences. By selecting the "System Preferences" app, a new window will open, providing an array of customization possibilities.
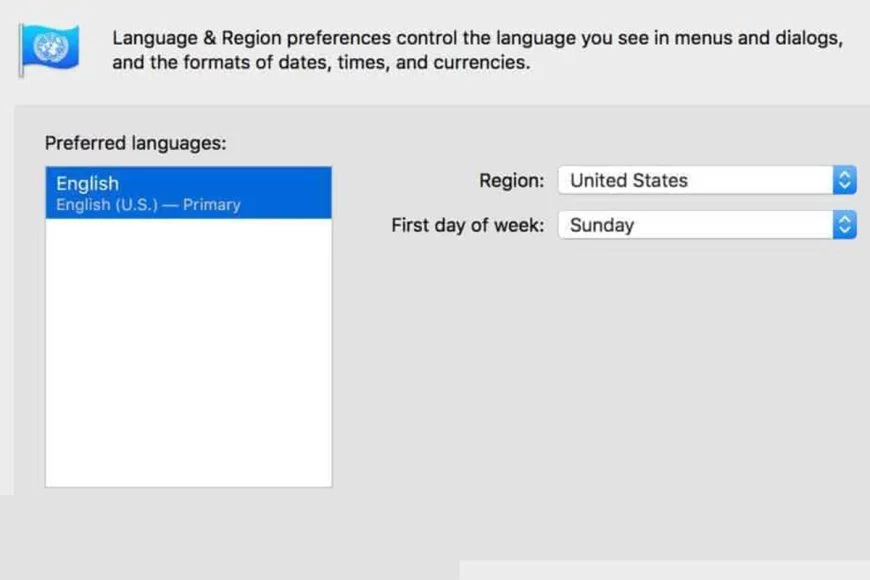
Within System Preferences, locate and click on "Language & Region." Here, you can modify both the primary language used by your Macbook and regional settings such as date formats and time zones. To change the language specifically, click on the "+" button at the bottom left corner of the window to add a new language to your preferred languages list.
Once added, ensure that your desired language appears at the top of the list. The order determines which language your Macbook uses as its default. You can rearrange languages by dragging them up or down accordingly.
It's worth noting that some applications may not support all languages equally well. In such cases, it's recommended to have your preferred language at the top of the list for seamless compatibility across various apps.
Apart from accessing System Preferences through the Apple menu directly, there's another way to quickly change certain settings related to language preferences using a keyboard shortcut. Pressing Command + Spacebar opens Spotlight Search—a handy tool for finding files and launching applications. Type "Language & Region" into Spotlight Search and hit Enter/Return when it appears in results; this will take you directly to Language & Region settings within System Preferences.
Step-by-Step Guide: Changing Language Settings on MacBook
Finding the Language Preferences in System Settings
To change the language settings on your MacBook, follow these simple steps:
- Go to the Apple menu located at the top-left corner of your screen.
- Click on "System Preferences" from the drop-down menu.
- In the System Preferences window that appears, click on "Language & Region."
Customizing Display, Region, and Format
Once you are in the Language & Region settings, you can customize various aspects according to your preferences. Here's what you can do:
Display Language
- Under the "Preferred languages" section, click on the "+" button to add a new language or use "-" to remove an existing one.
- Drag and drop your preferred language to set it as the primary display language.
Region Settings
- Click on the "Region" tab within Language & Region settings.
- Choose your desired region from the dropdown menu.
- This selection will affect date formats, time zones, and other region-specific settings.
Formats
- Navigate to the "Formats" tab within Language & Region settings.
- Customize how dates, times, numbers, and currency are displayed by selecting different options from each dropdown menu.
Additional Steps for Advanced Users
For those who require more advanced language customization options or need to install additional languages:
- Click on "Advanced…" located at the bottom-right corner of Language & Region settings.
- A new window will open with various tabs for fine-tuning language-related features.
- Explore options such as sorting orders and input sources according to your requirements.
By following these straightforward steps outlined above, you can easily change language settings on your MacBook without any hassle.
Remember that modifying system-wide language preferences may require restarting certain applications for changes to take effect fully.
Now that you know how easy it is to change the language settings on your MacBook, you can customize it to match your preferences and enjoy a more personalized user experience.
Changing Keyboard Language on Mac: Instructions
Changing the keyboard language settings on your Mac is a simple process that allows you to type in different languages effortlessly. Whether you need to switch between English and Spanish, French and German, or any other combination of languages, the following instructions will guide you through the process.
Find out how to change keyboard language settings on your Mac.
To begin changing the keyboard language on your Mac, follow these steps:
- Click on the Apple menu located at the top-left corner of your screen.
- Select "System Preferences" from the dropdown menu.
- In the System Preferences window, click on "Keyboard."
- Under the "Input Sources" tab, you will see a list of available languages for your keyboard.
- To add a new language, click on the "+" button at the bottom left corner of the window.
- A list of available languages will appear – select the desired language(s) by checking their corresponding boxes.
- Once you have added all desired languages, close the Input Sources window.
Explore different keyboard layouts available for various languages.
Mac offers a wide range of keyboard layouts tailored to different languages. Here are some examples:
- QWERTY: The standard layout used for English and many other Western European languages.
- AZERTY: Commonly used in French-speaking countries like France and Belgium.
- QWERTZ: Popular in German-speaking countries such as Germany and Switzerland.
- Dvorak: An alternative layout designed for increased typing efficiency.
By selecting specific keyboard layouts, you can enhance your typing experience and ensure that special characters unique to each language are easily accessible.
Follow clear instructions to switch between keyboard languages effortlessly.
Once you have set up multiple keyboard languages on your Mac using the steps mentioned above, switching between them is straightforward:
- Click on the input source icon located at the top-right corner of your screen, next to the date and time.
- A dropdown menu will appear, displaying all the languages you have added.
- Select the desired language from the list.
Alternatively, you can use a keyboard shortcut to switch between languages quickly. By default, pressing "Command + Space" allows you to toggle between your primary and secondary keyboard languages.
Changing the keyboard language on your Mac opens up a world of possibilities for multilingual users. Whether you need to communicate in different languages or simply want to explore new ones, these instructions provide an easy-to-follow guide for customizing your keyboard settings.
Remember that practice makes perfect. So don't hesitate to experiment with various layouts and immerse yourself in the linguistic diversity that your Mac offers!
Now that you know how to change the keyboard language on your Mac, start exploring new horizons and embrace the convenience of multi-language typing right at your fingertips!
Switching Language of Mac Applications and Keyboard in Windows
Changing Languages for Mac Applications Running in Windows
One common challenge users face is switching between different languages for Mac applications. Fortunately, there are several methods you can employ to ensure seamless communication across various software platforms with multilingual capabilities.
To change the language of Mac applications while running Windows, follow these steps:
- Open the application for which you want to switch the language.
- Look for the application's menu bar at the top of your screen.
- Click on the "Application" tab in the menu bar.
- Scroll down and find the "Language" or "Preferences" option.
- Click on this option to open a dialog box that allows you to select a different language.
- Choose your desired language from the available options in the dialog box.
- Click "OK" or any other applicable button to confirm your selection.
By following these steps, you can easily switch between different languages for Mac applications running on your Windows-based MacBook.
Changing Keyboard Input Sources While Using Windows on a Mac
In addition to changing languages for Mac applications, it's essential to know how to switch keyboard input sources when using Windows on a Mac. This functionality ensures that your keyboard is correctly configured for typing in different languages.
To change keyboard input sources while using Windows on a Mac, try one of these methods:
- Shortcut Method: Press Command + Space simultaneously to bring up an input source selection window. From here, choose the desired keyboard layout or language.
- System Preferences Method: Go to "System Preferences" by clicking on the Apple icon located at the top-left corner of your screen and selecting "System Preferences." In System Preferences, click on "Keyboard," then navigate to the "Input Sources" tab. Here you can add new input sources by clicking the "+" button and selecting your preferred language or keyboard layout.
- Menu Bar Method: If you have enabled the menu bar icon for input sources, click on the icon located at the top-right corner of your screen. From the drop-down menu, select the desired keyboard layout or language.
By utilizing these methods, you can effortlessly change your keyboard input sources to match different languages while using Windows on a Mac.
Step-by-Step Guide: Changing System Language on MacBook
Changing the system language on your MacBook can be a simple process, allowing you to customize your device to suit your preferences. In this step-by-step guide, we will walk you through the process of changing the system language settings on your MacBook.
Selecting Primary and Secondary Languages
The first step in changing the system language is selecting the primary and secondary languages for menus and dialogs. This allows you to have multiple languages available on your MacBook without affecting individual app preferences.
- Go to the Apple menu located at the top-left corner of your screen.
- Click on "System Preferences."
- In the System Preferences window, click on "Language & Region."
- On the left-hand side, you will see a list of languages. Drag and drop your preferred language to the top of the list to set it as the primary language.
- If you want to add a secondary language, click on the "+" button below the list of languages and select your desired language from the options provided.
By selecting both primary and secondary languages, you can easily switch between them whenever needed.
Switching Between Languages
Once you have set up your preferred system languages, switching between them is a breeze.
- Click on the input menu icon located in your menu bar (it looks like a flag).
- From the dropdown menu that appears, select your desired language.
- The system language will now change instantly, with menus and dialogs adapting accordingly.
This quick switch feature allows for seamless transitions between different languages depending on your needs or personal preferences.
Additional Language Options
Apart from changing system-wide settings, macOS also provides additional options for managing specific app preferences related to language.
- Open any application that supports multiple languages.
- Go to its Preferences or Settings section.
- Look for an option related to "Language" or "Localization."
- Here, you can customize the language settings for that specific app without affecting the overall system language.
This feature is particularly useful if you frequently use applications that require a different language or if you prefer to keep certain apps in a specific language while keeping the rest of your system in another.
By following these step-by-step instructions, you can easily change the system language on your MacBook. Whether you want to explore new languages or simply personalize your device, this guide provides all the information you need to get started.
Choosing Language for Individual Apps on Mac
Customizing language preferences for specific apps according to personal needs is a useful feature that allows users to have a more personalized experience on their Mac. Unlike the overall system language setting, which changes the language across all apps and menus, setting different languages for each application independently ensures that certain apps use specific languages while others remain unchanged.
To begin with, it's important to note that not all apps support different languages or localizations. However, many popular applications do offer this feature, giving users the flexibility they desire. Here's how you can go about changing the language settings for individual apps:
- Identify supported apps: Start by identifying which of your preferred applications allow you to set different languages. Most productivity tools, such as Microsoft Office Suite and Adobe Creative Cloud applications, provide this functionality.
- Access app preferences: Once you've identified an app that supports customized language settings, open the application and navigate to its preferences or settings menu. Usually, you can find this option under the "Preferences" or "Settings" tab in the top menu bar.
- Locate language options: Look for a section within the preferences menu specifically dedicated to language or localization settings. It may be labeled as "Language," "Localization," or something similar.
- Choose preferred languages: Within the language options section, you'll typically find a list of available languages or checkboxes representing different localization options. Select your preferred languages from the list provided.
- Set priority order (if applicable): Some applications allow you to prioritize multiple languages in case there are conflicts between translations or if your preferred language is not available in certain areas of the app interface. Arrange your selected languages in order of preference by dragging them up or down on the list.
By following these steps, you can easily customize the language settings for individual apps on your Mac. This ensures that applications you frequently use are displayed in your preferred language, enhancing your overall user experience.
It's worth mentioning that while changing the language settings for specific apps is a great way to personalize your Mac experience, it may not be available for all applications. Therefore, it's essential to check an app's documentation or support resources to determine if this feature is supported.
Mastering Language Change on MacBook
Congratulations! You have now mastered the art of changing language settings on your MacBook. By following the step-by-step guides and instructions provided in this blog post, you can easily switch between languages, change keyboard settings, and even select different languages for individual apps. Now, you have the power to personalize your MacBook's language experience according to your preferences.
But don't stop here! There is so much more you can explore and customize on your MacBook. Take some time to dive deeper into the settings and options available to you. Experiment with different languages, try out new keyboard layouts, and discover how it can enhance your productivity or make your Mac experience even more enjoyable.
So go ahead, unleash the full potential of your MacBook by exploring its language features. Remember, if you ever need a refresher or encounter any difficulties along the way, feel free to revisit this blog post as a handy reference guide. Happy language switching!
FAQs
Can I change the language back to English if I accidentally set it to another language?
Yes, absolutely! If you accidentally set your MacBook's language to something other than English (or any other desired language), don't worry. Simply follow the same steps mentioned in this blog post to navigate back to the Language & Region settings and choose English (or your preferred language) as the primary system language.
Will changing my system's language affect my files or applications?
No, changing the system's language will not affect your files or applications. It only modifies the user interface and system menus according to your selected language preference. Your documents, photos, videos, and installed applications will remain unaffected.
Can I use multiple languages simultaneously on my MacBook?
Yes! macOS allows you to enable multiple input sources for different languages simultaneously. This means that you can switch between different keyboards or input methods for various languages without having to change the overall system language setting.
How can I add a new language to my MacBook?
To add a new language to your MacBook, go to the Language & Region preferences and click on the "+" button under the Preferred Languages section. From there, select the desired language from the list and click Add.
Can I change the language of specific applications without changing the system language?
Yes, you can! macOS allows you to set individual language preferences for different applications. Simply follow the instructions provided in this blog post under "Choosing Language for Individual Apps on Mac" to customize the language settings for specific apps without affecting the overall system language.
What's Your Reaction?